Friday, December 19, 2014

Flow Blue and White Vintage Dresser Makeover

Happy Friday before Christmas!  This month has been packed full with activities and has flown by... which is why it's taken forever to share this latest makeover with you: my Flow Blue and White Vintage Dresser!


This dresser belonged to my great uncle, so it has loads of sentimental value... and while I wanted to breathe new life into into, I didn't want to take away all of its patina, its signs that it was well-loved.

When my sister dropped this off in my garage, it was a little worse for the wear.  The top had several peeling layers of varnish, the wood veneer was warped and dry... it was in need of some love.


I gave it a good cleaning, lightly sanded the peeling varnish, lightly glued the warped veneer, and stripped and sanded the wood top.


After staining with a dark walnut stain, I loved the sheen of the natural wood so I didn't do my usual polyurethane coating and instead added a few layers of Miss Mustard Seed's furniture wax, then buffed away.  It's so smooth I can't help but run my fingers across it when I walk by.


You want to touch it, right?  Mmmmm.  The wood frame around the mirror was in good shape and the color was close to the stained top, so I cleaned the frame and waxed it and it was perfect.


Since the original knob was missing a partner, I replaced it with this great pair of vintage-looking knobs that I found at Hobby Lobby.  While not a perfect match with the original drawer handles, they coordinate nicely and fit it well with the period of the piece.


It's a little difficult to see here, but this is the area where the veneer was warped and cracking.  I wanted to keep the veneer but didn't want to risk catching something on it and damaging it more, so I did a little bit of gluing and clamping to do a minor repair.


Now let's get to the best part... that color!  I used Flow Blue Milk Paint from Miss Mustard Seed with the bonding agent (so it wouldn't chip) on the body of the dresser, and Annie Sloan Old White on the drawers and mirror frame.  This was my first experience using MMS milk paint and it was... different.  I was nervous about mixing the portions correctly but I did two batches and the color matched, so I guess it was okay.  The paint was thinner than I'm used to (with chalk or latex paint) but the color was perfect so I didn't mess with it.  I ended up doing two coats and then waxing with MMS furniture wax, which I love.  The consistency is like buttah and it doesn't have a terrible smell.

I'm not a huge fan of the really distressed pieces, so I lightly sanded along the edges where natural wear would occur.  I sanded after waxing this time and I like the result much better than when I sand prior to waxing - lesson learned for future pieces, although with this makeover, I've officially emptied my garage of works-in-progress.  I KNOW.  Whatever shall I do now?!

I've moved this dresser into my master bedroom and am slowly building a gallery wall around it.  I'm new to the whole gallery wall thing so it's taking me a while to commit... remember, this is the master bedroom makeover that's been two years in the making so it's all about taking things slow around here.  Ha!

Here's hoping you have a Merry Christmas - may you be filled with the joy of Christ Jesus this season!

Sunday, November 30, 2014

DIY Advent Calendar Roundup

Tomorrow is the first day of December - can you believe it?!  If you're on top of things, you are already prepared to start your holiday countdown with an advent calendar but  just in case you're still in need of ideas, here's a roundup of some fun advent calendars you can DIY before it's too late!


TOMFO-DIY-Santa-adventcalendar

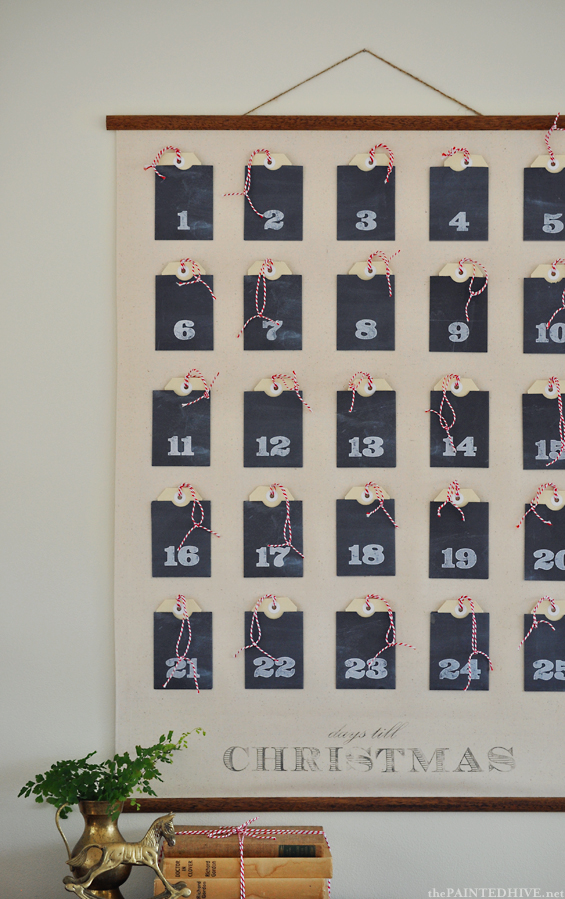
Advent Calendar Wall Chart (with FREE printables!) | The Painted Hive


Love the clean look of this simple Advent calendar and it's surprisingly well-suited for making with kids of all ages!


Pretty fun ideas, right?  I had an idea to make a new advent calendar this year but decided instead to be lazy just use my pillow again (see first link) --- next year though, it's on.  I better get started soon so it's finished in time for next Christmas...

Monday, November 24, 2014

Mid-Century Modern Peacock Blue Desk

Hey, hey there friends!  Happy Thanksgiving week to you!  I’ve got a short work week in store so I’m looking forward to spending time with my kiddos and getting my holiday bake on… #bringonthepie.  But first, how about a furniture makeover reveal?  Here’s my Mid-Century Modern desk, redone in a gorgeous peacock blue.


This makeover has been a long time in the making.  I bought this desk off of a local mom’s garage sale page a looong time ago and between the repairs it required and finding time to actually work on it, it took quite a while to finish.  Here’s the desk when I first bought it (for 40 bucks!):

photo

Although it appeared to be in great condition, one of the drawer bottoms had a hole in it and the back panel had an even bigger hole in it.  Whoever owned this in the past was not very gentle with it.  There were numerous dings to the top and sides, but I just decided to embrace those as part of the piece’s history and after moving this desk, I have no doubt why it’s dinged up – this thing is seriously heavy.  No joke. 
After a good cleaning, I painted this with bonding primer and two coats of Martha Stewart’s Plumage Blue, a gorgeous peacock blue color.
MCM Peacock Blue Desk

The hardware was one of the reasons I loved this piece – it was a little tarnished, so I cleaned it and added some Rub-n-Buff in Antique Gold.  I love that stuff: remember this Golden Mirror Makeover?

MCM Desk Redo

I love fun details on furniture, so I lined the drawers with a gorgeous blue and green ikat fabric I found at Hobby Lobby.  Simply cut the fabric to size and use Mod Podge to adhere to interior of drawer.


I used the same fabric in an additional, unexpected place.  Remember the back panel hole I told you about?  I was concerned that removing the panel would damage the surrounding veneer, so instead I covered it, using a foam mat board, the ikat fabric, and some ribbon trim.


One last peek -


I am loving our new-to-us desk, which moonlights as a craft table.  It’s the most recent addition to our ever-evolving office makeover; I still want to add drapes and replace our existing TV cabinet with an IKEA Hemnes unit, among other small touches.  It’s neverending, isn’t it?

Hope you have a blessed Thanksgiving week!

Linking here:

Wednesday, November 5, 2014

{Work It} Wednesday - Pencil Skirt and Booties

Happy Wednesday friends!  I'm so happy to be back with another edition of Work It Wednesday, where I share my version of work-appropriate style.  Mind you, I'm a nurse, so I've spent the majority of my career in scrubs and clog, thus finding my work style is a recent and ever-evolving process.  Today, the look is pencil skirts and booties - yes, it can be done!


This week, I stepped out of my comfort zone and paired my leopard booties (here) with a high-waisted black pencil skirt (old, similar here).  The top is a flowy blouse with interesting detail (old Loft, similar here) and a colorful cardigan (here) adds some fun.

Have a great rest of the week - break out those booties and have fun with them!

Thursday, October 30, 2014

Sugar Skull Wreath

I have an obsession with Sugar Skulls... they are such a beautiful representation of the Day of the Dead, a time when deceased loved ones are remembered in Mexican/Aztec tradition.  I think I also have a fondness for Dia de los Muertos because my mother passed away on November 1st, which is when the cultural holiday begins.  I decided to forgo the traditional Halloween wreath this year to pay homage to the Day of the Dead and made a Sugar Skull Wreath.


The idea for this started when I found a paper mache skull mask at Joann's.  I painted it white and then, using a picture I found online as a guide, I hand-drew and painted the skull art.


I wanted a big, fluffy black wreath on which to showcase the skull, so I made my first mesh wreath which was much more difficult than I anticipated.  There is truly an art to working with the mesh and getting the loops just right.


The colorful burlap roses from Hobby Lobby were a perfect addition.  I love how they pull in all the colors of the mask against the black mesh.  I used some leftover orange pom pom trim from my No-Sew Halloween runner as a hanger.


Throw in my turquoise door, a few pumpkins, and some dying mums (geez, will I ever not kill a plant?!) and we're ready to welcome you for fall... 

Linking here:

Wednesday, October 29, 2014

{Work It} Wednesday - Cropped Pants and Heels

Happy humpday friends!  I'm back with the second installment of Work It Wednesday, where I show you my ever-evolving work style that doesn't include ripped up skinny jeans or any of the other ridiculous "work" outfits found on Pinterest.

Today, it's all about cropped pants and heels.


I brought back my fave cropped pants (Gap skinny mini pants) for this look and paired it with a leopard blouse I found at Charming Charlie's (similar), a green cardigan (J Crew factory Clare cardigan), and Vince Camuto nude snakeskin pumps (here, 40% off right now!).

Cropped pants have become my unofficial work uniform, especially since it's still eighty plus degrees in Texas right now... I'm already thinking of ways to incorporate them once it actually gets cooler.  Any ideas for me?

Have a great rest of the week - remember to keep the skinny jeans out of the corporate world!

Thursday, October 23, 2014

DIY Lazy Susan

Whew!  The past week has been a real doozy for me at work so I haven't had a lot of energy in the evening hours... thus I'm just now posting my latest project, the DIY Lazy Susan that I shared in my No-Sew Halloween Runner tutorial.


I've had a dough bowl on my table for a while and while I love it, we had to do a lot of reaching around it when we were passing the salt or getting a napkin.  I thought a lazy susan would be a great solution - and a personalized one would be even better - so I picked up a few things and got to work.


To make your own, you'll need:
unfinished pine circular board (I found mine at Lowe's)
wood stain
sandpaper
paint
stencil
polyurethane
turnstyle hardware (found in cabinet section at home improvement store)


Instructions:

1.  Stain your board your desired color - I used weathered grey from Rustoleum - then sand with a fine-grit sandpaper.


 2. Stencil/draw your desired message.  I used a stencil for my smaller letters/numbers, placing them an inch away from the edge of the wood.  I freehanded the large U as I couldn't get the right size to print on my printer...


3.  Paint lettering.  I hand-painted all letters because I was going for a handpainted look, but you can certainly paint over the stencil if you want.


4. Once paint is dry, coat with polyurethane to protect the finish.

5.  Add turn-style hardware to opposite side of board.


6. I was worried about the turn-style scratching the surface of my table so I added a small piece of adhesive foam (from my craft stash) to pad it.  


That's all, guys.  Super easy, super inexpensive - I think this project cost me around $10.


I'm loving our new lazy susan - it's an addition that meets my criteria of being not only beautiful but also useful.  My girls enjoy spinning it to get their salt and pepper as opposed to reaching around the dough bowl/antlers that used to be in its place - I'll admit that sometimes they enjoy spinning it a little too much but oh well... they're only little for a while, right?

Hope you're having a great week - it's almost the weekend so hang in there!!

Linking here:
The Handmade Hangout
Inspiration Gallery
Inspire Me Please
Link Party Palooza
Show and Tell Saturday
The 36th Avenue

Monday, October 13, 2014

Halloween No-Sew Runner Tutorial

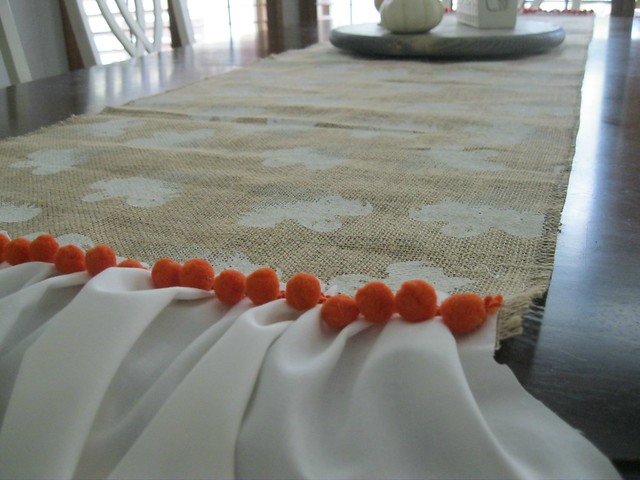
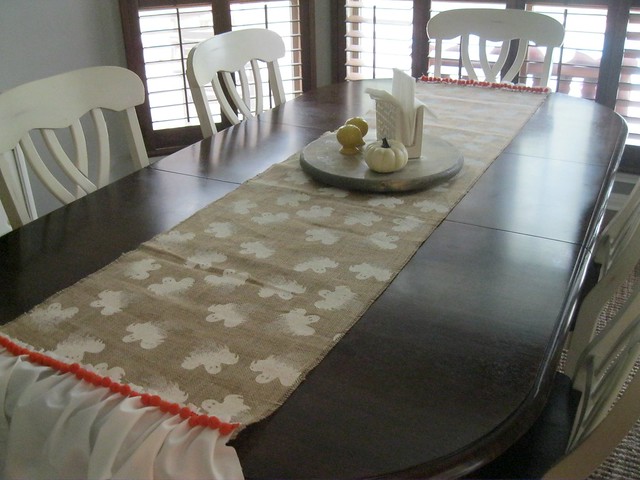
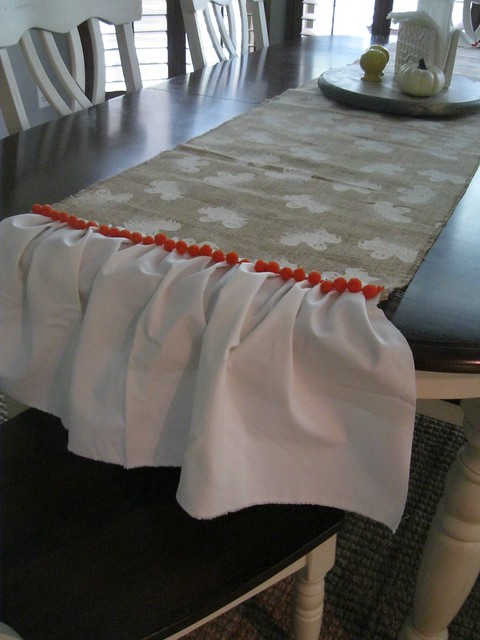
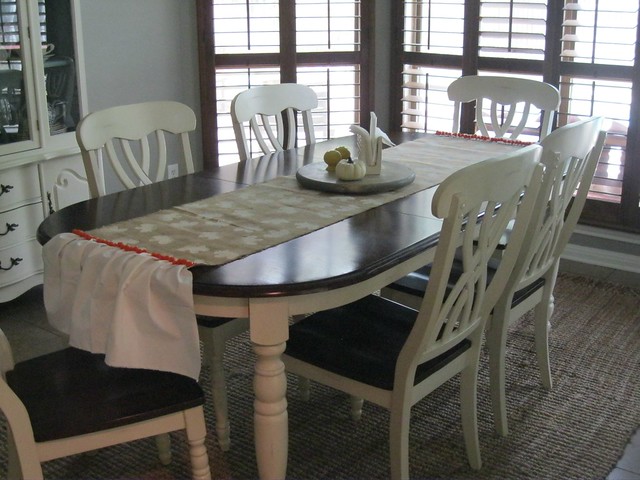
Hey there friends!  Hope you're having a great week so far... can you believe its already mid-October?  I know I can't, which might explain why I'm just now starting to decorate my home for Halloween.  I'm starting with this No-Sew Halloween Runner:


I found this great ghost-stamped burlap at Joann's a few weekends ago and knew I wanted to use it for a table runner.  I had intended to sew it but couldn't get the mojo to bring out the old sewing machine so I used the next best thing... a little hot glue.  My plan is to just spot clean as needed so the glue was a great option here.

No Sew Runner


Halloween No Sew Runner

This runner is super-simple to make:

You'll Need:
2 yards burlap (longer if you have a longer table)
1 yard white muslin (or other fabric)
pom pom trim
hot glue

Instructions:
1.  Cut burlap to desired width.  Mine is 16 inches wide.

2.  Pull burlap threads along long sides to create frayed edge.

3.  Cut muslin to desired length.  Mine is 10 inches long.  Width of muslin should be double the width of your runner.  Mine is 32 inches.

4.  Fold muslin in half to find middle of width.  Hot glue midpoint to the midpoint of the burlap.

5.  Beginning on one edge, secure the fabric to the burlap with glue as you gather in even puckers.


6.  Next, hot glue pom pom trim just under the top edge of the fabric.


7.  Repeat on the opposite edge, and that's it!  Enjoy your runner!

No Sew Runner


No Sew Runner

Halloween No Sew Runner

I'm already loving my new table runner, and I love how easy it was.  I foresee more holiday no-sew runners in my future... I can already imagine some red and turquoise christmas fabric with natural burlap!

I'll be back with another Work it Wednesday post and will be sharing more details on that cute lazy susan gracing my table... make it a great week!

Linking here:
Inspiration Gallery
Inspire Me Please

Wednesday, October 8, 2014

{Work It} Wednesday - Lime and Leopard Work Style

Happy Humpday and welcome to a new series here on home.made. called Work It Wednesday, where I'll show you what I wear to work as I strive to infuse more style into my work wardrobe.

I don't know about you, but I sometimes peruse "work outfits" on Pinterest and I have to laugh, cause unless you work at the mall or in a place with no dress code, most of the looks are unwearable in office.  Ripped skinny jeans... ripped boyfriend jeans... shorts... apparently as long as you pair these with a blazer and heels they are appropriate work attire.

So, since I do have a dress code to uphold, I'll be sharing my looks with you and providing links to similar or the same items.  (No affiliates involved.)  Here we go: my first look is Lime and Leopard.


I paired a fun lime ruffled top (old Nicole Miller from JC Penney, similar) with a white cardigan (old Banana Republic, similar), Gap skinny mini skimmer khakis (here), and Vince Camuto leopard print booties (here).  My bag is from Barrington Gifts - I won a bag giveaway from Cassie at Hi Sugarplum! and have been obsessed with it since.  It's huge and holds everything!

If you have any questions and any request for work looks, let me know!  Have a great Wednesday friends!

Monday, October 6, 2014

How to Remove Lipstick Stains from Clothing

I had a complete freak-out moment last weekend when I went to get my clothes out of the dryer and found this:

That would be an empty tube of lipstick… that made it through an entire cycle in the dryer with some of my favorite clothing!  Noooooo!  Once I regained my composure, I decided that trying to get this lipstick out of my clothes would be a cheaper alternative to replacing them all.  Happily, I was able to get most of the lipstick out so I’m here to share the details with you in case you’re ever in my shoes.

Note: there are not before/after photos for this post.  See aforementioned reference to freaking out.

Here’s what I did:

1. Apply liquid detergent to each (yes, each) lipstick stain.  There will be a lot so prepare yourself for this to take a while.  Rub in detergent to stain with a toothbrush or old towel.

2.  Soak your clothing in the warmest water it can tolerate, either with a pre-soak option in your washer or in a sink/tub.

3.  Follow this soak with a full wash cycle in the warmest water your clothing can tolerate.

4.  Once your wash cycle is complete, inspect clothing for remaining stains.  If stains persist, repeat soak and wash cycle.  (I ran mine through three of these cycles and about 90% of the lipstick stains were gone.)

5.  Before your dry your clothing, make sure you’ve cleaned your dryer of any remaining lipstick residue.  If you don’t do this, you’re likely to end up right where you began.


I was quite ecstatic that I was able to get most of the lipstick out – it was everywhere, y’all.  There were a few items of clothing that didn’t have a lot of success: a few camis and unmentionables made out of a stretch knit material.  Since they go under my clothing, it was no big deal.  My jeans survived, as did some of my favorite tops – whew.  Mr. home.made. would not have been happy about me replacing all of that in one fell swoop.

I hope you’re better than me about checking pockets and you’re never in this situation, but just in case… try this out and see if it works for you before you throw everything out.  Your husbands will thank me.

Happy Monday y’all!

Monday, September 29, 2014

DIY Felt Acorn Garland

One of my favorite things about this time of year is collecting fallen acorns as I walk around my neighborhood.  I love using them in my décor and fall crafts, like my Acorn Tree or Glittered Acorns or Giving Thanks Wreath… and my latest addition, a DIY Felt Acorn Garland.


One of the bad things about fresh acorns is that they eventually begin to dry out and shrink and then fall out of their caps, so making a garland out of the real deal would be beautiful but it wouldn’t last long.  I decided to use some leftover felt balls to create a longer-lasting acorn garland.

To make this, you will need:
  • Acorn caps of varying sizes
  • Felt balls of varying sizes
  • Twine or Yarn
  • Hot Glue
Felt Acorn DIY

This project is very simple – simply hot glue the felt ball inside the acorn cap.

Felt Acorn DIY Tutorial
DIY Felt Acorn

Next, hot glue the acorns to a thin piece of twine or yarn for your garland, leaving room at the ends for hanging.  So simple and such a sweet touch of fall.

DIY Felt Acorn Garland

I added mine to my Dining Room Hutch, along with a glittered apple garland.

Tutorial Felt Acorn Garland

I look forward to using this garland for many seasons to come… I’m already thinking about making another with all white felt balls – wouldn’t that be pretty?  I could even find a way to work it into my Christmas décor somehow…

Have you been making anything with fallen acorns?  Link up in the comments so I can see!

Linking here:

LinkWithin

Related Posts with Thumbnails