Saturday, December 29, 2012

Christmas 2012

Sharing some glimpses into Christmas in my home this year…

Christmas vignette home.made.

My Willow Tree nativity and last year’s cinnamon ornaments graced my entry.

Cookies home.made.

Christmas cookies are always a fave.

Snowglobe home.made.

Our miniature waterless snow globes (since the bottle brushes rust in water!).

Tree 2 home.made.

One of several Christmas trees – my MIL gives us ornaments each year with our childrens’ photos so we can see how much they’ve grown!

Christmas girls

And of course, my two reasons for the magic of this season.

Only a few days until 2013!!

Monday, December 24, 2012

{Free Printable} Twas the Night Before Christmas

It's the night before Christmas... but how about a free printable to put up just in time for ole Saint Nick's arrival??


Wishing you a blessed and joyous holiday season!

Friday, December 21, 2012

{Teacher Gift} Child’s Artwork Tea Towel

I wanted to do something special for my girls’ teachers this year, something a little more personal than the usual gift card or Bath and Body Works lotion set.  I wanted to give their teachers a gift that they could use and that would remind them of my girls beyond this Christmas.  This is the end result:
I had both of my girls draw pictures for their teachers – my oldest made an animated tree, complete with googly eyes.
artwork tea towel
My youngest drew a picture of her and her teacher with a tree and falling snow.  (Note, the circles on the pictures are sleeves, not what you think they are!  Giggle.)
I scanned their artwork into my computer and printed them on iron-on transfer paper.  I ironed the designs on to my fave flour sack towels from Target, added a jumbo rick rack trim and the bottom and embroidered over their names with a simple back-stitch.
I love children’s handwriting, and I love that the embroidery captures this sweet handwriting forever.
I packaged the towels with gift cards for the teachers and tied the gift with thick green yarn.
Here they are, ready for gift-giving today on the last day of school – made by hand, with lots of love from two special littles whose lives were touched by two wonderful teachers.

What are you giving as teacher gifts this year?

Linking up here:

Wednesday, December 12, 2012

Family Photos!!

I’m ashamed to admit it, but my girls are five and seven and we had never had a real family portrait taken.  Sure, we’ve got plenty of family pics taken by friends and family, but there’s just something special about a professional family portrait, don’t you think?

Since it gets dark so early this time of the year, our photo session was scheduled for the afternoon.  I actually took the day off work so I wouldn’t have to leave early and feel rushed in getting the fam ready.  Funny story… Mr. home.made. talked me into a trail run that morning and wouldn’t you know it… I sprained my ankle!  Since my outfit included heels (beauty is pain, right?) it made for an adventuresome photo session.

We used a fantastic local photographer, Caressa Captures, who just happened to go to college with my sister and who I just happen to sit next to on Monday nights when our girls are in gymnastics.  I couldn’t be more pleased with the outstanding job she did…

2507 (2)

My girls normally are hams in front of the camera, especially my little one, but it took a little while to get them to loosen up for Ms. Caressa.  (Guess that’s what happens when it’s their first real photo shoot!)

2789 (2)

As all great photographers do, she captured not only their beauty…

2625

but also their personalities.

2903

That, my friends, would be the “clover tongue”, so lovingly passed down from a certain daddy to his daughters.  Ahem.

We are blessed beyond measure!

Sunday, December 9, 2012

Magnolia Leaf Poinsettia


I’m continuing my nature-inspired Christmas series with my latest creation… my Magnolia Leaf Poinsettia!
While at my sister’s house last weekend, I asked if I could have some leaves from her magnolia trees with the intention of making a garland.  As I gathered fallen leaves, I quickly realized that I would need A LOT of leaves for a garland.  I toyed with the idea of a wreath, but that seemed pretty time-consuming as well.  So I ended with this: a festive poinsettia that didn’t cost a cent to make!

Want to make some for your home?  Here’s how:

You Will Need:

  • magnolia leaves (fresh or fallen, although fresh are a little more pliable)
  • liquid silver leaf (optional)
  • craft felt
  • hot glue gun
  • alligator clips (optional)

Instructions:

1.  This first step is optional if you don’t want your leaves silver, but if you do… brush on liquid silver leaf to your leaves.  Trust me, it’s beautiful.  You could use craft paint as well if you’re going for a colored look (traditional red or white, perhaps?).
2.  Once leaves have dried thoroughly, you’re ready to put your leaf “petals” together.  Cut a piece of felt 1.5 inches wide by 6 inches long.  Fold in thirds, securing with hot glue.  This will form a sturdy base for your poinsettia.
004
3.  Take your leaves and hot glue to felt base in a cross pattern.  (You’ll want to not only glue the center/stems, but also the back of the leaf to the felt.)
006
4.  Allow the glue to dry a bit, then add four more leaves in a cross pattern between the first leaves.
007
009
5.  Set aside to dry fully.  Now, out of your felt, you’ll need to cut a shape like this:
010
I just free-handed this, alternating heights as I went.  (If you’re in need of a template, let me know and I’ll get one on the blog).
6.  Roll felt piece at the bottom edge, securing with hot glue as you go.
011
012
When you’re done, it will look like this:
013
7.  Hot glue your felt “stamen” to the center of your poinsettia.
017
8.  You’re done!  (Unless, of course, you want to add an alligator clip on the back so you can clip this to a garland or tree limb.  If that’s the case, simply hot glue to felt base.)

I tucked my poinsettias into the garland over my front door…

I’m loving them! 
The rest of my entry still needs a little more… something.  Once I figure it out I’ll show you the full reveal!
Hope you enjoyed this tutorial and that you’re inspired to pick up some fallen leaves and give them a new life!
Linking here:
Under the Table and Dreaming, Three Mango Seeds, Uncommon Slice of Suburbia, Home Stories A to Z, Savvy Southern Style, Shabby Creek Cottage, Tatertots and Jello, Be Different Act Normal, Funky Junk Interiors, It's Overflowing

Thursday, December 6, 2012

Nature-Inspired Christmas Series {Ornament}

I’m finally catching up on life around here and wanted to post the first of my nature-inspired Christmas decorations… an ornament made from those awesome Burr Oak acorns that I showed you a few days ago.

This particular acorn only had the remaining “hat” when I found it on one of my runs… and I thought it was a perfect setting for a miniature winter wonderland!  The tiny tree nestled inside the mossy acorn cup is simply magical.
If you’re lucky enough to have these acorns where you live, here’s how to make your own!

You will need:

006
  • Burr Oak Acorns/Caps
  • Mini Bottle Brush Tree (I found mine in the craft section at Hobby Lobby and soaked them in a bleach/water mixture to turn them white.)
  • Glue
  • Fake Snow (not pictured)
  • Glitter

Instructions:

1.  Coat the inside of acorn cap with glue, securing the tree in the middle.
007     008
2.  Add fake snow around the tree.
010
3.  Add additional glue on top of snow and sprinkle with glitter.
011
4.  Set aside to dry.  Once dry, invert to remove excess glitter.
5.  Simply set on tree branch for display.  Enjoy…

There’s more to come in the christmas series, so stay tuned.  Up next will be a fun way to repurpose fallen leaves… and more acorn crafts!

Linking up with these fab sites:
Craftberry Bush
Crafty Scrappy Happy
Whipperberry
Be Different Act Normal
Tatertots and Jello
Positively Splendid
I Heart Naptime
It's Overflowing

Tuesday, December 4, 2012

Christmas Decor from Mother Nature

I am working on some additions to my holiday decor this year... special little somethings that you won't find in a store made out of these beauties:


I'll give you a minute to catch your breath.

Gorgeous, right?!

These are burr oak acorns - I have a neighbor down the street with a gigantic burr oak tree and I stalk it every winter, waiting for these to fall and rushing to pick them up before someone drives over them.  I have been known to pick these up during a run and run a mile or two with it in my hand... crazy?  Maybe just a little... 

With acorn or without, these are fabulous and I am completely smitten.

Can't wait to show you what I'm doing with them... stay tuned!

Thursday, November 29, 2012

{Tutorial} Knock-Off Ballard Designs Advent Pillow

I recently received the holiday edition of Ballard Designs’ catalog in the mail.  Amidst all of the gorgeous pages of holiday décor was this Advent Pillow:
advent
Cute right?
Apparently a lot of other people think so too, because it looks like it’s already no longer available…
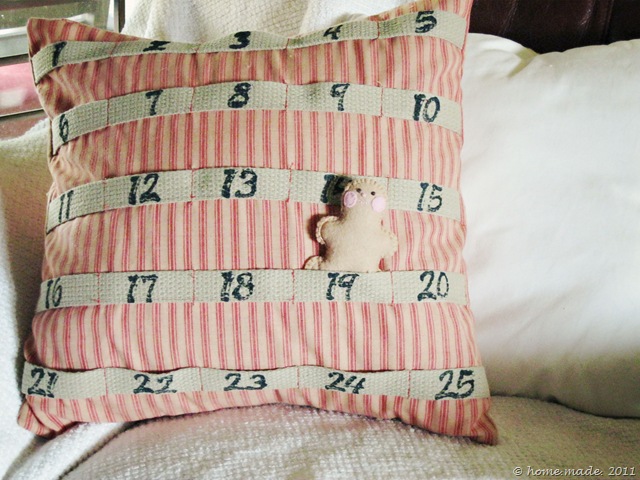
What’s a girl to do?  In this case, make one!  I present my version of the BD Advent Pillow:


Want one for your very own?  Here’s the how-to!

You Will Need:

  • 1 yard fabric (I chose a cotton ticking stripe)
  • 2 yards cotton webbing (found in the ribbon section of your fabric store)
  • 16 x 16 pillow insert
  • Number stamps and fabric paint (or number stencils), paintbrush

Instructions:

1.  From fabric, cut one 17” x 17” square and two 17'” x 10” rectangles (be sure to match direction if using stripes)

004

2.  Cut five pieces of webbing, each 17” long.

011

3.  Measure two inches from top of 17” x 17” square and line up top of your cotton webbing.  Pin in place.  Then measure two inches from bottom of webbing and line up top of next strip.  Pin.  Repeat for remaining strips.

013                      
4.  Sew along bottom of each cotton webbing strip as close as possible to the edge.  I used a straight stitch.
 015

5.  When you are finished, it will look like this:

012

6.  Next, you are going to measure across to mark your “pockets”.  Measure in four inches from the left edge and mark.  Measure three inches and mark (three times).  I found it easier to mark all pieces of webbing at the same time to help keep the pockets in line.

017

7.  Sew along each line, stay-stitching on each end of the webbing for reinforcement.  The easiest way to do this (rather than snipping threads after each time) is to complete one vertical seam, pick up your sewing needle and pull through fabric to the next line and repeat until all five vertical seams are sewn.  Then repeat for the next column.
(See in the pic how the thread connects in between the webbing?  You’ll snip it later, so no worries.  This will save you a ton of time!)

018

8.  Once all vertical pockets are sewn, it will look like this:

019

9.  Now set this piece aside and lets work on the back pieces for the envelope closure.  On the long end of your rectangle (WS), fold in edge 1/4” and press.  Fold this in again 1/4” and press, then pin.  Repeat for other rectangle, then sew along each seam using a 1/8” seam allowance.

001

10.  Now it’s time to assemble your pillow cover.  Lay the 17” x 17” rectangle RSU.  Line up 17” x 10” rectangles with the edges WSU.  These pieces overlap as they will form an envelope closure.  Pin along outer edges.

002

11.  Using a 3/8” seam allowance. sew along outer edges, stay-stitching over the overlapping seams for extra reinforcement.  Trim threads and finish raw edge with a zigzag stitch, serger, or pinking shears.  Turn right-side out and press.  (Sorry, I don’t have a picture for this part…)

12.  Now it’s time to put on your numbers!  I used wooden stamps and black fabric paint, then hand-stamped the numbers to the center of each “pocket”.  Note – the stamps work better if you brush the paint on with a paintbrush rather than coat it as if in ink.  Trust me, I learned this the hard way. ';)  If you’re worried about your paint bleeding through, place a piece of heavy card stock or cardboard inside your cover.
004                                  005

13.  Allow paint to dry and that’s it!  Now find something to use as your Advent pillow marker.  I used a felt gingerbread man, but  you can use a candy cane, or a small Christmas cookie cutter, whatever you like.


Hope you enjoyed this tutorial and that you make one of these pillows to help count down the days until December 25th!!


Linking up:
Whipperberry
Craftberry Bush
Tatertots and Jello


Days of Chalk and Chocolate
Home Stories A to Z


Wow us Wednesdays

The 36th Avenue
Scraps of Life
Keeping the Christmas Spirit Alive
Somewhat Simple

LinkWithin

Related Posts with Thumbnails