Wednesday, July 28, 2010

Easy (and Delish) Italian Cream Cake

I love italian cream cake... so naturally I made it for my husband's birthday last week (so I could eat some!)  Since the recipe is so incredibly easy, I thought it fit to share: enjoy!


Italian Cream Cake

Ingredients:
1/3 c buttermilk
1/2 c oil
1 c sour cream
4 eggs
1 box white cake mix
1 small box instant vanilla pudding mix
1 c sweet flake coconut
2/3 c pecans

Combine buttermilk, oil, sour cream, and eggs.  Add cake and pudding mix and beat on low speed to combine for two minutes.  Add coconut and pecans, mix for two minutes.  Spoon into prepared 9x13 pan.  Bake at 325 degrees for 40-45 minutes.

Once cool, ice cake with cream cheese icing (store-bought or homemade), and sprinkle with more pecans.  YUM!

Thursday, July 22, 2010

LBB Round Two!!

Okay - I don't have pics of Lil Sis wearing it... but here are some pics of the LBB halter dress. 


It turned out really cute... dh even thinks so!

Things I did differently this time... I serged the inner seams rather than straight-stitched (for durability).  I think I might try serging on the outer edge next time, but I'm liking this look for now.  I also added three rows of the bottom section to make the dress longer and give it a ruffle-y feel.  Can't wait to see it on her!


Tuesday, July 20, 2010

Bring it On, Tooth Fairy

The tooth fairy pillow is complete, and ready for whenever that little tooth decides to make its entrance, er exit.  Big Sis had her fingers in her mouth quite a bit this evening, just wiggling (and willing) it to come out... she did manage to take them out long enough to snuggle up to her new softie and give her a name:  Toothy.

Yeah.  Original.

I was hoping for something like Flossie or Queen Canine or Molarita... but no.

Toothy it is.

So, without further ado... I present Toothy!


All that's missing... is a tooth!

Sunday, July 18, 2010

Lovin' Lil Blue Boo

After admiring her creations for some time, I finally purchased one of Lil Blue Boo's patterns... and I am in love!  I made the most adorable little dresses for the girls out of some of their tee-shirts and some jersey knit I picked up on sale at Hobby Lobby. 
I chose the T-shirt halter pattern, since it is summer, and was so pleased with the results!  Check out this cutie:

The tee is one she got from Nana and Popo's trip to Mount Rushmore - I love the shirt, but she'd never wear it, so I turned it into a dress.

Big Sis was the recipient of a dress as well, but she was not happy about being told what to wear this morning.  The drama was ridiculous.  She has lost her fascination with anything that mama makes her, and thus puts up a fight when I want her to wear something I've made - I admit, I was not the most patient mama this morning while listening to her wailing and whining.  I wonder sometimes if any other 5 year olds in the world act like this... I sometimes think we give her too much freedom and independence that she thinks she is the one running the show.

I digress.

Back to the dress.  The cutting and sewing was incredibly quick and easy, and I can see myself making a lot of these in the future - right down to getting a limited license from LBB so I can sell some, perhaps? (I love the idea of using soft old shirts with interesting graphics and turning them into something new and completely different.)  Rather than add the loops in back to tie the straps, I simply added some elastic to help pull in the fabric in the back for a better fit.  In the future, I'll probably either get thinner elastic and place it under the trim or I'll attempt some smocking with elastic thread.  We'll see.

This was the first time I've sewn with jersey knit, and I'm loving that as well - I even threw together a little racerback tank this afternoon (that was not picture worthy, but it'll be good for a trip to the gym - LOL) for me.  I can't wait til Ashley comes out with a pattern for adults - I'll be all over that.

Now... just wishing I hadn't taken all those old shirts to Goodwill! 

Friday, July 16, 2010

Popsicle Sleeves, anyone?!

I just finished a batch of popsicle sleeves to put in the shop, and they're yummy!  Made from Oh Cherry Oh! charm packs, they're bright and cheerful and summery!


Wednesday, July 7, 2010

Truck Trash Bag... for Him!

When I was writing the trash bag tutorial way back when, I offered one of my prototypes to my dh to use in his truck, and he gave me two reasons he didn't want one.
1.  It wasn't "manly" enough.
2.  It wouldn't fit on his power cord cap.
Darnit.
I bought some camo fabric and altered the design a little... and came up with this:


I omitted the buttonhole and instead added two straps with velcro, to secure the trash bag around your headrest.


I love the camouflage, and I think it'll meet the "manly" requirement.  I did sneak in a little bit of girly with the coral liner (cause that's the color I had!)... we'll just call it "Safety Coral", right?


*** I will be adding the strap option to the tutorial, but probably not until the weekend.***
And for those of you not wanting to make one of these, I'll hopefully be adding some to my etsy shop this weekend as I am beginning:
Operation New Sewing Machine!!
That's right... I'm ready to trade up for a better sewing companion but I'm gonna need to sell some 'wares to get the dough for it.  Stop by this weekend to check out my etsy and get the new tutorial option!

Friday, July 2, 2010

Love Your Lunchbox!!

I finished Big Sis' new lunchbox this morning, and I adore it!!  Let me tell ya, if she doesn't want to use it to take her lunch to school, I have no shame using it for mine! 


The fabric is just so gorgeous and soooo my daughter - it truly makes this bag beautiful.


My dh kept watching me construct this bag, acting like it was the most difficult project ever, and I had to laugh... because it wasn't!  There are quite a few steps involved, but it really is an easy pattern to follow and an easy project to make.  If I didn't have to make things in stage (due to wanting  needing to get some sleep), I could've finished this in a day or two.


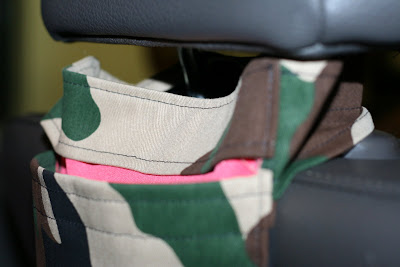
There are pockets on either side of the bag, just the right size for utensils or for a fruit roll-up, and dontcha love the contrast of the fabrics?  Moments like this make my heart go *pitter* *patter*.


And the glorious interior!  The pattern suggested oilcloth or cotton for the interior lining, and I opted for the cotton since I knew I'd be washing this bag frequently.  (I also didn't feel like switching out my sewing needle, but we won't mention that...)

A couple of things:  I didn't put in the bottle holder that was part of the pattern.  After cutting it and looking at its size, I didn't think it'd fit any of the cups or bottles we own, and at that point, I was too anxious to put the bag together that I didn't make a larger one.  No biggie.
If When I make this again (I can already guess that Lil Sis needs one too), I'll make a few more changes.  I'll probably add an interior pocket so I can insert a cold pack or smaller snacks.  If I add a bottle holder, I'll just make two fabric strips with velcro so it is adjustable for different size bottles/cups.  I'll also probably reduce the seam allowance, which is a generous 5/8 inch.  I hated cutting off so much of the seam, thinking that the bag could've been a teensy bit bigger otherwise!

Other than those, I wouldn't change a thing.

Now... is it lunchtime yet?!


LinkWithin

Related Posts with Thumbnails