I realized as I was starting the tutorial pumpkin session that I didn't have enough usable burlap left over from my first two run-throughs to make another pumpkin... so I substituted with a similar fabric: linen. It worked fabulously and made for a softer pumpkin, which is more fun for your kids to enjoy!
What You'll Need:
1/2 yard burlap, linen, or fabric of your choice for pumpkin body
scrap of felt, burlap, fabric for pumpkin stem
embroidery thread/needle
poly-fil, stuffing beads, beans, etc.
freezer or parchment paper for template
Instructions:
1. You'll need to make templates for the pumpkin sections and stem.
For the pumpkin section, fold paper in half and draw a shape that is similar to half of a cat eye. Then cut around shape. (This can be customized to whatever size pumpkin you desire. I used a nine-inch center section to create a six-inch round pumpkin.)
For the stem, you'll create a template that looks like a cross. You'll also need to adjust this based on the size of your pumpkin. For mine, I drew a one-inch square center with three-inch sections from each side.
2. Next, trace templates onto fabric and cut. You'll need to cut out six pumpkin sections and one stem. (I double my fabric for the pumpkin sections so I can cut more quickly.) At this point, I sprayed the linen pieces with starch and pressed them to make the fabric a little sturdier.
3. Now it's time to put your stem together. Line up the side of one of the end pieces with the side of the nearest end piece.
Using a 1/4 inch seam allowance, sew a straight stitch, beginning where the two edges meet.
When you are done, it should look like this.
Repeat this step for all remaining sides.
Turn stem right-side out and set aside.
4. Now on to the pumpkin sections. Place two pieces WST and pin along one side.
Next, mark a dot one-half inch down from each pointed end.
Starting at dot, sew a straight stitch along pinned side to other dot, using a three-eighths inch seam allowance. When you're done, it should look like this. (Don't trim your threads just yet... you'll need them later!)
Layer another section inside, WST, and repeat previous instructions.
See the pumpkin beginning to take shape?
Repeat until you've added all of the pumpkin sections. Then pin together the final seam in the same fashion and sew as before. To keep from sewing over the other sections, keep the pieces you've already sewn folded accordion-style to the left of your working section.
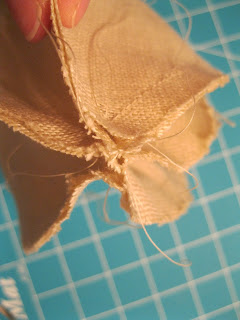
5. Now it's finishing time! Remember how I told you not the trim your threads? Here's where you use them: on one end of your pumpkin, separate out your threads so you'll have two between each section. Taking the threads from one section, tie them to the threads from the opposite section, repeating several times to make a sturdy knot. Repeat with the other sections until all threads are tied, then trim.
6. Now get out your stuffing material and fill that stem! When you're done, pinch in the ends of the stem and sew a straight stitch, to keep the stuffing inside.
7. Stuff your pumpkin through the top opening with your filling of choice, shaping your pumpkin as you go. Then place the stem inside the opening.
Using embroidery thread, attach stem to top of pumpkin using a whipstitch.
And that's it! You're done! At this point, you can embellish some more if you want by adding leaves or ribbons... or a simple jute bow, as I did.
Hope you enjoyed this tutorial - if you make any pumpkins, come back and comment to let me know so I can visit your blog and see your creativity!


smart tutorial...cute..
ReplyDeleteI need some sewing skills, because I would love to make these! Thanks for linking up to The "Autumn Décor" Talent Scouting Party at WhisperWood Cottage, Rhonda!
ReplyDelete