Monday, January 28, 2013

{Free Valentine Printable} Owl Always Love You

I’m a sucker for a good play on words, and while I was working on some sweet little owl necklaces for that long-neglected etsy shop of mine, this phrase kept repeating in my head.  Owl always love you… I’ll always love you.  Get it?!  (Mr. home.made. inserts eye-rolling right about now.)  Anyhoo, here ya go!


005


Friday, January 25, 2013

{Giveaway} L-O-V-E Clay Bunting Necklace

It’s Friday… I’m in love!  And what better way to share the love than a giveaway, right?  Remember this necklace?

[078%2520copy%255B5%255D.jpg]

This is my Clay Bunting Necklace that I created for the One Month To Win It competition way back when… and today, it’s up for grabs!  That’s right, I’m giving it away!  Wouldn’t this make a great Valentine’s gift for a special friend (or maybe for you)?

All you have to do to enter is leave me a comment telling me what you’re loving the most today.  It could be something your kiddos said, it could be your latest thrifting find… whatever it is, I want to know!

Giveaway ends January 31, 2013 at midnight.  Winner will be chosen by random number integer.


GOOD LUCK!

Wednesday, January 23, 2013

Valentine Doily Tea Towel

Do any of you have towels that you know were white when you bought them and then you get them home and all of a sudden your husband does laundry they’re stained?!  Me too (sorry honey…).  Here’s an easy little project to hide the stains and decorate for Valentine’s Day at the same time!


I don’t have a “real” tutorial for you, but it’s really very simple.  I picked up some fabric medium and added it to some acrylic paint in my stash, per the instructions.  I put a little of each color on a small, individual plate, spreading it evenly for a surface area just a bit larger than the paper doily.

Take your heart doily and press it into the paint (right side down), covering the doily fully with paint.  Then, use the doily as a stamp and press onto your towel. I used a paper towel while I pressed on the doily to keep my fingers from getting covered in paint and thus spreading paint on the open areas of the doily.


After allowing to dry, I added some ric rac trim to the bottom edge of the towel, just for fun.


The stains are covered up and I’ve brought some Valentine cheer to my kitchen in all of about five minutes.  The doily “stamp” could also be used to create one of a kind Valentine tees, or perhaps stamped on a burlap pennant banner… what other ideas can you think of?  Talk to me!

LInking up here:
Savvy Southern Style 
Jennifer Rizzo 
Tuesday's Treasures 
Craftberry Bush 
Design, Dining, and Diapers 
Crafty, Scrappy, Happy 
Miss Mustard Seed 
Tatertots and Jello 
Be Different Act Normal 
I Heart Naptime 
Transformation Thursday 
It's Overflowing 
The 36th Avenue
The Sunday Showcase
Love of Family and Home

Monday, January 21, 2013

Are You a No Reply Commenter?

Hi sweets~
Today’s post is dedicated to all of you lovely people who are so kind to leave comments, ask questions, etc.  I am so thankful that you take the time to visit my little corner of the blog world and I want to be able to thank each of you and answer your questions.  If you are a “No Reply” Commenter, I’m unable to do so…


  • noreply-comment@blogger.com Edit this addressRemove this address


See that?  This is the email address connected to your comments and your Blogger profile if you're designated as a “No Reply” commenter…  So, how do you know if you’re affected by this?  Go to your blogger profile and click Edit Profile, then check your email address associated with your blog and make sure it’s correct.

Identity

-----------------------------
Required
Changing this does not change the e-mail address you use to sign-in.
Required: The name used to sign your blog posts.

Then, under privacy, make sure you check ”Show my email address”.

Privacy

Currently set to home.made.blog@hotmail.com
Show my blogs Select blogs to display This list of blogs will only be displayed on your user profile.
If checked, sites you've followed in either Blogger or Google Friend Connect will appear in your profile. Help

Click SAVE, and that’s it!  I can finally respond to each and every one of you lovies!
Go… now.  Can’t wait to chat with ya!

Sunday, January 20, 2013

Valentine Ombre Wreath

I have slowly been adding in some touches of pink and red for Valentine’s Day, including this fun little ombre Valentine wreath…

Valentine Wreath home.made.

The ombre effect is not as gradual as I’d hoped, but I had two little girls who were very anxious to help their mama wrap yarn around this and, well, they were just so proud when they were done that I couldn’t bring myself to redo it.  Love those girls.

Valentine Wreath XO

I went to my go-to chipboard letters and some Martha Stewart coarse white glitter to add a little hug and kiss…

Valentine Wreath close up

Caterpillar pipe cleaners make the most perfect heart shape… and I thought a cascade of hearts was the perfect finishing touch.

V Day wreath

No pun intended, I’m a little bit in love with this wreath already.

Are you putting up Valentine’s décor yet?

LInking up here:
Savvy Southern Style
Jennifer Rizzo
Tuesday's Treasures
Craftberry Bush
Design, Dining, and Diapers
Crafty, Scrappy, Happy
Miss Mustard Seed
Tatertots and Jello
Be Different Act Normal
I Heart Naptime
Transformation Thursday
It's Overflowing
The 36th Avenue
The Sunday Showcase
Love of Family and Home

Wednesday, January 16, 2013

Furniture Transformation Roundup

When I look back at all of my projects for the past year, it seems that there was a recurring theme… furniture makeovers!  Let’s take a look back, shall we?
Furniture Collage
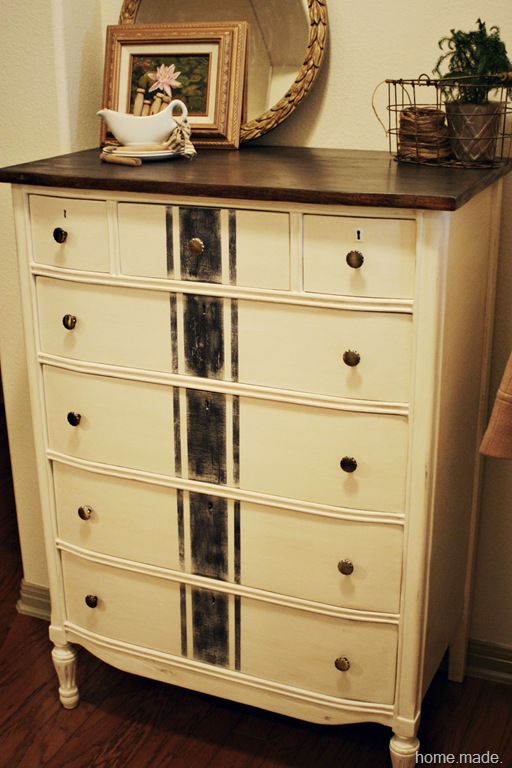
I started out the year with this French Grain Sack Dresser.
036 copy
Then my husband showed his mad wood-restoring skills with the Imperial Desk Restoration.
Next up, I brought my own touch to a family heirloom with this Curio Transformation.
This sweet vintage Vanity and Dresser set turned out exactly as I had envisioned.
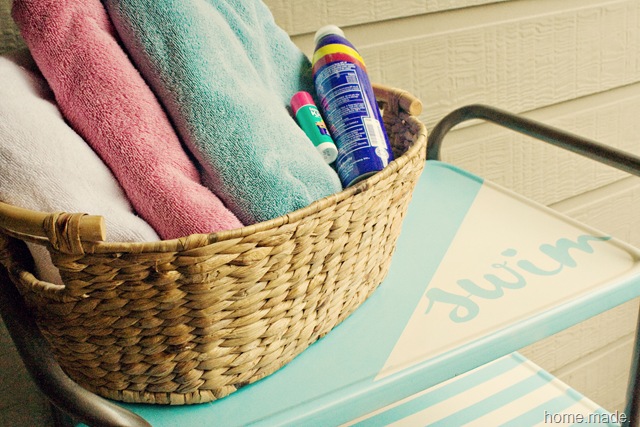
My back patio is now so cheerful after the Aqua and White Tea Tray makeover.
004 copy
A little blue, white, and a strategic stripe were just the ticket for this Nautical Aubusson Blue Desk.
aubosson blue desk
I took a break from furniture during the summer, and then picked back up with a little Chevron Side Table.
duck egg chevron table
Last, but not least, a Green Desk Makeover for my nature girl’s safari bedroom.
Green Desk Animal Print Chair
It was a pretty good year for furniture, don’t you think?
Linking up here:
Savvy Southern Style
Jennifer Rizzo
Tuesday's Treasures
Craftberry Bush
Design, Dining, and Diapers
Crafty, Scrappy, Happy
Miss Mustard Seed
Tatertots and Jello
Be Different Act Normal
I Heart Naptime
Transformation Thursday
It's Overflowing
The 36th Avenue

Monday, January 14, 2013

Zebra Nightstand Makeover

I showed you the Green Desk Makeover for my daughter’s room redo, and now it’s time to show you another piece of the safari room adventure… zebra stripes, anyone?
zebra nightstand
This nightstand (and the matching dresser) were my first grown-up furniture purchases after getting my own place, when I thought that anything from Pottery Barn was wonderful.  I paid a pretty penny for these pieces, even over ten years ago.  You can’t see it in this picture, but the corner of this nightstand was lovingly chewed on by my beloved pug when he was a puppy.  I wasn’t happy with it at the time (Pottery Barn, remember?) but now that he’s gone, that little chewed area will never see a piece of sandpaper. 
I originally repainted these a light pink for my daughter’s big girl room when I was pregnant with my youngest.  I didn’t feel up to stripping through the pink paint and primer so I painted this with ASCP in pure white.  The stencil was traced with pencil and painted with the same color as the wall (Glidden’s Water Chestnut).  If you’re wondering why I traced with a pencil rather than painted with the stencil… it’s because I couldn’t get the knobs off (I ashamedly admit that I painted these on way back when!).  Cest la vie, right?
zebra nightstand home.made.
There’s a bit of dark wax rubbed on there, just to tone down the brightness of the Pure White paint.  See that green lamp?  I bought that well over ten years ago as well – and treated it to a couple coats of the same paint as the desk and a new burlap lampshade from Target. 
safari room
Tucked in the corner, it’s a fun little addition to this slowly-evolving room makeover.  It’s exciting as the little pieces fall into place – the desk, the nightstand, the whimsical DIY mosquito netting over the bed.  There’s a terrific thrifting find behind that netting too… just you wait!
I still have a dresser to repaint (still pink!) and want to change out her bedding, plus add some more wall art, but all in due time.  Small budgets equal slow progress – luckily I’m not in any hurry.


Linking up here:

LinkWithin

Related Posts with Thumbnails