Tuesday, March 25, 2014

Living Room Update Progress

I gave you a sneak peek last week of some of the updates in my living room, and today I’m sharing a little bit more with you.  I’ve been slowly transforming this room for what feels like forever, and it’s finally starting to feel more like home around here.  Here’s the view you saw last week:

Computer Armoire Makeover copy

Here’s what it looked like before…

006

This picture is actually after I painted over the mustard yellow walls – and I have yet to repaint that green trim.  One of my home goals this year is to finally tackle the trim-painting beast.  It’s not something I’m looking forward to,  but it’s long overdue.

All that paint talk aside, here’s how things are looking now:

Living Room Progress Ektorp

We sold our leather sofa set on Craigslist and replaced it with the Ektorp chaise sectional from IKEA.  I really like this sofa.  It’s taken some getting use to for my hubby (not quite as cushy as the leather set), but he knows I like it so he doesn’t complain much.  Besides, part of the compromise was his very own man chair… yep, a recliner.

Living Room Progress Recliner

When he asked for a recliner I groaned… literally.  All I could picture was a gargantuan ugly La-Z-Boy from the eighties, so imagine my surprise when I found a recliner that was a normal size and was, *gasp*, pretty too!  This is the Franklin recliner from Plow and Hearth.  It’s gorgeous and it’s comfortable and Mr. home.made. is constantly fighting his three chicks for this chair!

The gallery wall of U’s behind the chair is a constant work in progress.  Do you know how difficult it is to find the letter U?  Seriously.  I find so many cute letters and there seems to rarely be a U.  Crazy.  Trust, us, a couple things I can’t spell without U.  Obviously these retailers don’t listen to the Biebs or they’d know what’s up.

I digress.

I shared my new reading corner with you last month.

Reading Corner Chair

And here’s one last view, looking into the kitchen area.

Living Room Progress Update

The wicker chair is IKEA, as is the little turquoise cart.  And I know you’re wondering about that fabulous rug, right?  It’s the moroccan trellis rug from Rugs USA and I got it during their 80% off sale during the summer.  It sheds like a friggin alpaca, but other than that, it’s great.  It’s thick and soft and gorgeous and I love the visual texture the pattern provides.

So there it is – our main living space and it’s little makeover.  I still have some things I want to do in here:

  • Paint Trim White!!
  • Find a smaller round coffee table (maybe glass with brass?)
  • Sell coffee and side table
  • ??Paint Computer Armoire
  • Move in piano from my grandmother
  • Plate wall above said piano :)

That’s about it… enough, right?

Hope you’re having a great start to your week.  I’m busy adjusting to my new job and working on last minute details for my 9 year old’s birthday party (in between soccer and softball)… can I get a nap please?!

Wednesday, March 19, 2014

Transforming an old Armoire into a Computer Workstation

When we decided to sell our custom home to make the move to a neighborhood, we left behind an office with fabulous built-ins.  This home technically had space for an office as well, but since we decided to use that room as a multi-purpose room, that left us without a dedicated space for our computer and files.  We did, however, still have our old TV armoire and since it hadn’t sold yet on Craigslist, we decided to give it a new purpose:

Armoire Computer Station Makeover

When we began working on this, it was your average, everyday armoire from a big name furniture store… with a huge hole cut out in back for the pre-flat screen era!  Mr. home.made. removed the original backing and replaced it with plywood.  Originally the backing was painted turquoise, but I changed my mind and “wall-papered” it with some weathered wood paper from Hobby Lobby that I found in the teacher section.  Adhesive vinyl chalkboard paper was added to the interior of each door for inspirational quotes and notes and drawings.

Armoire Computer Station

My handy hubby built and stained the upper shelving that we use as a charging station for our devices and he built a sliding shelf for the laptop.

Computer Armoire Slide Out Shelf

It’s now a place for me to blog and for my kiddos to play computer games, all within the safe viewing distance of us, which was one of our goals for a centralized computer station.  With the addition of some cute office accessories from Target, it’s also a place for me to pay bills and file mail.  The lower cabinets are used to house our printer and as an area to file away paperwork.  It truly has become a workhorse!

Computer Armoire Makeover copy

I have another post planned on changes in our living room, but here’s a little peek to show you how the workstation fits into the layout.  When we have people over and don’t want the office area on display (meaning when it’s a mess of papers…), we simply close the doors and shut it away.  I’m still toying with the idea of painting this beast so there’s not such an abundance of wood tones, but the hubby is resistant so I’m holding out for now… 

This little makeover has really served our family well and turned out to be a lucky Craigslist failure.  Have you repurposed an old piece of furniture by giving it an entirely new function? 

Linking Up Here:
Savvy Southern Style
Work It Wednesday
I Heart Naptime
Be Different Act Normal
Get Schooled Saturday
The Scoop
Home Stories A to Z
Inspire Me Monday

Monday, March 10, 2014

Mason Jar Herb Planters

Happy happy Monday friends!  I had a nice four-day weekend, including a two-day stint as a stay at home mom before I start my new job today… I’m pretty sure I could totally do the SAHM thing (at least part-time) one of these days, but for now I’ll be heading back to the ole’ 8to5 routine.

One thing I won’t be giving up my day job for is to be a gardener, given my history of having a black, er brown thumb.  Nevertheless, I’m determined to overcome my reputation as a plant-killer this year and I’m starting with these: Mason Jar Herb Planters.

Mason Jar Herb Planter

When my daughters told me they wanted to “plant something” a couple of weekends ago, I thought it might be good to start small with some herbs.  Secretly though, I have always dreamt of cooking all Giada-like with some fresh herbs that I just snipped from my garden so this project was a little self-serving.  Thanks kids :).

The blue Ball jars have been sitting in the transoms above my kitchen windows because I love when the light shines through the blue glass, so they seemed to be the perfect choice for my new herb garden.

Mason Jar Herbs

I placed river rocks on the bottom to assist with drainage and then layered soil on top before planting.  I purchased my herbs at my local Home Depot and Lowe’s – most were from Lowe’s because the variety there was so much better.  The plants were less than $3.00 each and were big enough to split into a couple of planters.  I even made a square planter for our neighbors – I’m waiting to make sure they’ll live and grow a little before I take them over.  Can’t tempt fate too much with my reputation…

Mason Jar Herb Planter Closeup

I had some clay tags left over from the Christmas market I did this year, so I used those to label my newly planted herbs.  I’ve got peppermint (mint julep, anyone?), rosemary, sweet basil, curled parsley, and thai basil.  I lurve me some thai basil – I’m dying to make some thai coconut curry soup with it.  Nomnomnom.

Windowsill Mason Jar Herbs

Here’s a pic of my mason jar herb planters in their new home – the lighting makes it so difficult to get a good pic of this, but trust me when I say those transoms were made for herbs in a jar!

Mason Jar Herb Planters home.made.

It’s been a week since I’ve planted these and so far, so good.  Everything’s still green and living and I’m hoping it stays that way.  I’ve been doing some reading on gardening herbs to try and keep them from succumbing to my usual plant mistakes – water too much, water too little.  Is there not an easy way to figure this out?!

If all goes well, I’ll be posting recipes soon using these little herbs – pray for us all.

Do you have a brown thumb like me or are you an avid gardener?  If you’re the latter, I’d appreciate any and all tips you can share!  Happy Monday lovelies!

Linking here:

Friday, March 7, 2014

Friday Faves–Minted.

Happy Friday!!  This week has been full of emotions for me as I left my workplace (and friends/co-workers) of the last four years to take a new opportunity that is closer to home.  I’m so sad to leave the people I love but I’m excited for what this new adventure will bring for me and my family.

I’ve been working on several projects a little at a time, but none of them are completely finished, so today I’m sharing some design inspiration and some fab wall art prints in my Friday Faves.

1.  First up, is this lovely new blog from the folks at Minted.: julep.

julep.

Julep is full of design/diy inspiration for your home and lifestyle.  I’m enamored with this room that’s featured in an article all about using neutral colors in your home.  I find myself gravitating more and more toward white, linen, and gray shades in my home in everything from furniture to paint colors and this room is dreamy…

There are other great design posts as well, including many by one of my faves… SF girl by bay.

2.  Saint Patrick’s Day is not typically a holiday for which I’ll go all-out with the decorations.  This eraser-stamped art just might make me change my mind since it’s fun, kid-friendly, and doesn’t scream St. Patty’s.

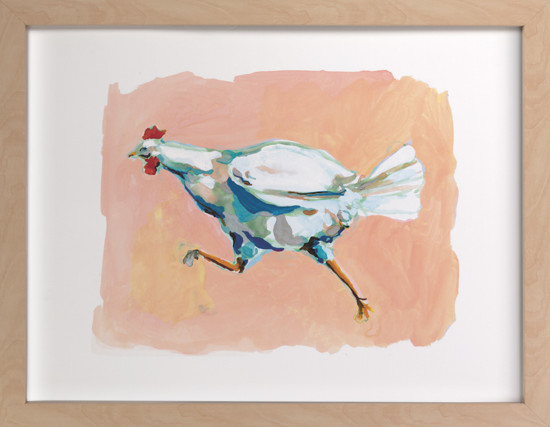
3.  Lastly, I adore these unique art prints found on Minted –who knew, right?  That chicken needs to be in my house, like, yesterday.  It sorta looks like me in the mornings trying to get the kids out the door on time!  And the little girl in the innertube?  Can you imagine that as a huge print over a little girl’s bed, because I certainly can!

Chicken Run

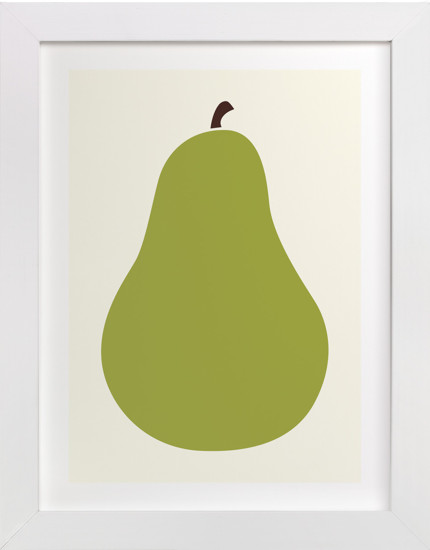
Heirloom Pear

Violet Intertube

So, what about you?  Any favorite finds that you’ve discovered this week?  Do tell!

Hope you have fantastic weekend friends!

Monday, March 3, 2014

Grain Sack Striped Barstools

Hey, hey friends!  Happy Monday!  The Texas weather has been completely bonkers as of late, with eighty degree temps one day and thirty degree temps the next… thanks a lot Polar Vortex.  I was able to take advantage of the warmer weather to get some projects completed, one of which I’m sharing today: my Grain Sack Striped Barstools.

Grain Sack Barstools

I bought these barstools for our previous home about five years ago – time, moving, and my kiddos had slowly taken their toll on them.  The funny thing is, I originally took these out to my garage just to tighten the bolts on the seats which loosen from time to time.  Then I got a wild hair… and the rest, I guess, is history.  Here’s the before:

photo (56)

They look pretty good in this pic, but trust me about the scuffs and scratches.  If you’re wondering, these were purchased from WalMart, and they’ve held up okay for the price.

After tightening the bolts and cleaning them, I painted them with two coats of Annie Sloan Chalk Paint in Provence.  I loved the color, but felt like there needed to be something extra… Inspired by my French Grain Sack Dresser, I decided to add some stripes in ASCP Old White and I love the end result.

Grain Sack Stripe Stool

I distressed these lightly with some 220-grit sandpaper, in anticipation that some natural distressing would occur anyway once these were in use.  I applied ASCP wax to the entire stool, including a thick coat of wax on the seat to help protect it from the little bums around here.

Grain Sack Stripe Barstool Detail

The center stripe was made using one-inch painter’s tape.  The outer stripes I just sorta eyeballed and added another piece of tape to make a thin stripe.  This part took less than ten minutes.

I’m quite happy with this little makeover – because my Aqua and White Hutch is painted in the same colors, these coordinate nicely and bring a fun dose of color to my dining area.

Grain Sack Stripe Barstool

I do think I need one more stool to fill the space better, so I’ll be ordering another soon and getting to work to make it match.  Slowly but surely, this little kitchen/dining area of mine is coming together.  The big project still remains… repainting the cabinets.  *groan*  Anyone up for a painting party?

Hope you’re having a great Monday!

Linking up here:

LinkWithin

Related Posts with Thumbnails