


- Posted using BlogPress from my iPhone
Monday, June 27, 2011
Monday Monday...
This weekend flew by... And let's just say I didn't get a whole lot accomplished around here except laundry! I got a great deal on a bed for Big Sis this weekend - now to get to work on painting it! Hope to have some progress soon!
- Posted using BlogPress from my iPhone
- Posted using BlogPress from my iPhone
Saturday, June 25, 2011
Enjoy the Win!
I was shocked and excited this morning when I opened up an email revealing that I was the winner of this fabulous stencil from The 36th Avenue!
![]()

I have to admit... I enter a lot of giveaways *cough* Silhouette *cough*, and don't ever win, so I feel pretty darn blessed this morning. Thanks Desiree!
Oh, and don't worry big sis... something will be made for you with this stencil!
Wednesday, June 22, 2011
What's Cookin' Wednesday, No.1 {Stacked Enchiladas}

Hi everyone! This post is going up late tonight as I was having issues with uploading images to Blogger this morning... grr. Anyhoo, I've decided to start a new weekly feature on home.made.:
What's Cookin' Wednesday!
I'd been contemplating joining in on the whole WIWW series with Lindsey at The Pleated Poppy when I realized that (a) I "get dressed" every day since I work outside the home so it defeats the whole purpose and (b) there's only one full-length mirror in my house and it's a cheapo so it makes me look larger than life! Soooo... I decided instead to focus on something else, like cooking for my family. With busy schedules, it's easy for me to get in a rut with cooking, so my challenge to myself is to try out a new recipe each week and share it with you. If you're interested in joining the challenge, let me know and I'd be happy to start up a linky party!
First up, Stacked Enchiladas!
Ingredients:
1 package corn tortillas (small)
1 pound ground beef
1/2 white onion, diced
1 15 oz. can diced tomatoes (with or without green chilies)
1 15 oz. can enchilada sauce (I like the mild red sauce)
shredded cheddar cheese
2 T cooking oil
salt and pepper
- Preheat oven to 350 degrees.
- Heat oil in large pan over medium-high heat. Add diced onions and saute until nearly transparent, then add ground beef and cook until brown.
- Drain meat/onion mixture, return to pan. Reduce heat to medium. Add salt and pepper to taste and add tomatoes. Cover and simmer for five to seven minutes.
- In a 9x12 baking dish, coat the bottom of the dish with a thin layer of enchilada sauce. Place two corn tortillas on top of the sauce, side by side. Place large spoonful of meat mixture onto each tortilla, then cover each with a little enchilada sauce and shredded cheese. Stack another enchilada on top of each stack (similar to lasagna) and repeat three more times.
- Place the final tortillas on top of each stack, top with enchilada sauce and shredded cheese.
- Cover dish with foil and bake for 20 minutes.
- Remove from oven and serve alongside your favorite sides. Refrigerate and/or freeze leftovers.
Makes: 8 servings (1/4 stacked enchilada=1 serving)
Bon Appetit!
Tuesday, June 21, 2011
DIY Dreamland!
Beth over at Home Stories A2Z is having an amazing summer series for all of us DIYers - have you seen it yet?! It's called How to Decorate {For DIYers} and it is ah-may-zing! Here's some of the fab DIY bloggers she has on the lineup:


And that's not even the half of it!
If you have DIY dreams and are in need of inspiration/motivation... head on over to the How to Decorate Series!
Sunday, June 19, 2011
Happy Father's Day
I feel so incredibly fortunate that I married a man who is such an amazing father.

Every day, he continues to be enchanted by these two little people who are our family. He plays with them, reads to them, tickles them... he takes them to the park and to the museum and to the zoo... he takes them for ice cream at Dairy Queen because he knows it's their favorite... he cares for them, fixes their hair, plays dress up with them, dances with them...
He has no problem being wrapped around their little fingers. *ahem*

I appreciate my husband so much as a father because he is so involved. He knows that we both signed on for this parenting thing and he never ceases to live up to that responsibility. He experiences life to the fullest with our girls every day.
He doesn't want a miss a thing.

Happy Father's Day, my gorgeous man. Thank you for all of the love you give to your household of girls.
We are so very blessed.
Friday, June 17, 2011
{Friday Fave} Heardmont's Master Closet
Do you ever come across something and simply think... perfection? Well, that's what I did when I saw the fantastic Master Closet redo by Meredith at Welcome to Heardmont. Perfection...

Everything is fantastic. The stripes... the jewelry board... the lighting... and the clothing organized by color... be still my heart.

I love how she took found objects and created a great jewelry storage/display area. The little stacked jewelry bowls are originally snack bowls - genius! The sassy framed zebra print is pretty fabulous too, no?

And it doesn't stop there. The girl hung a drum shade for lighting. I. Am. In. Love.
I have a feeling I'll be dreaming up a way to redo my closet one of these days. Lucky for me, my closet layout just so happens to be a lot like the Heardmonts. Hmmmmm. Coincidence? Or Fate?
If you haven't been over to Welcome to Heardmont, please stop by and tell Meredith hello. The Heards have done some drool-worthy decorating at their place that you must check out!
Wednesday, June 15, 2011
This is dedicated to the one I love...
Nine years ago today, I married my best friend.

Nine years later, I'm still madly in love with him.
He makes me laugh. He makes me smile. He makes me feel like I'm the most beautiful woman in the world. He is the most amazing father to our little girls. He is my rock, my confidante.
He is the love of my life.
Happy Anniversary to the man who makes me want to be a better me. Love you.
Saturday, June 11, 2011
{Tutorial} Father's Day Wreath

Around our house, Dad's the word, and not just because Father's Day is coming up. My girls LOVE their daddy (as do I)... so I thought I'd dress my door with a little something for the man of the house. Better yet? You can make one too! Here's how:
You Will Need:

Styrofoam Wreath Form
White Button-Down Men's Shirt (I thrifted this one at Goodwill for $1.oo)
Jute twine
D, A, D letters (mine are foam but you can use wood, chipboard, whatever!)
Paint and Mod Podge
Fabric for a bowtie (or the real thing, if you have one) I used the Bow Tie Tutorial from A Lemon Squeezy Home to make mine.
Hot Glue
Ready? Here we go!
1. The first step is a little tedious, but so worth it. Wrap your wreath form in the jute twine, securing with hot glue as you go. (I spent an hour doing this, while watching Deadliest Catch. Good times.)

When you're done, it will look like this:

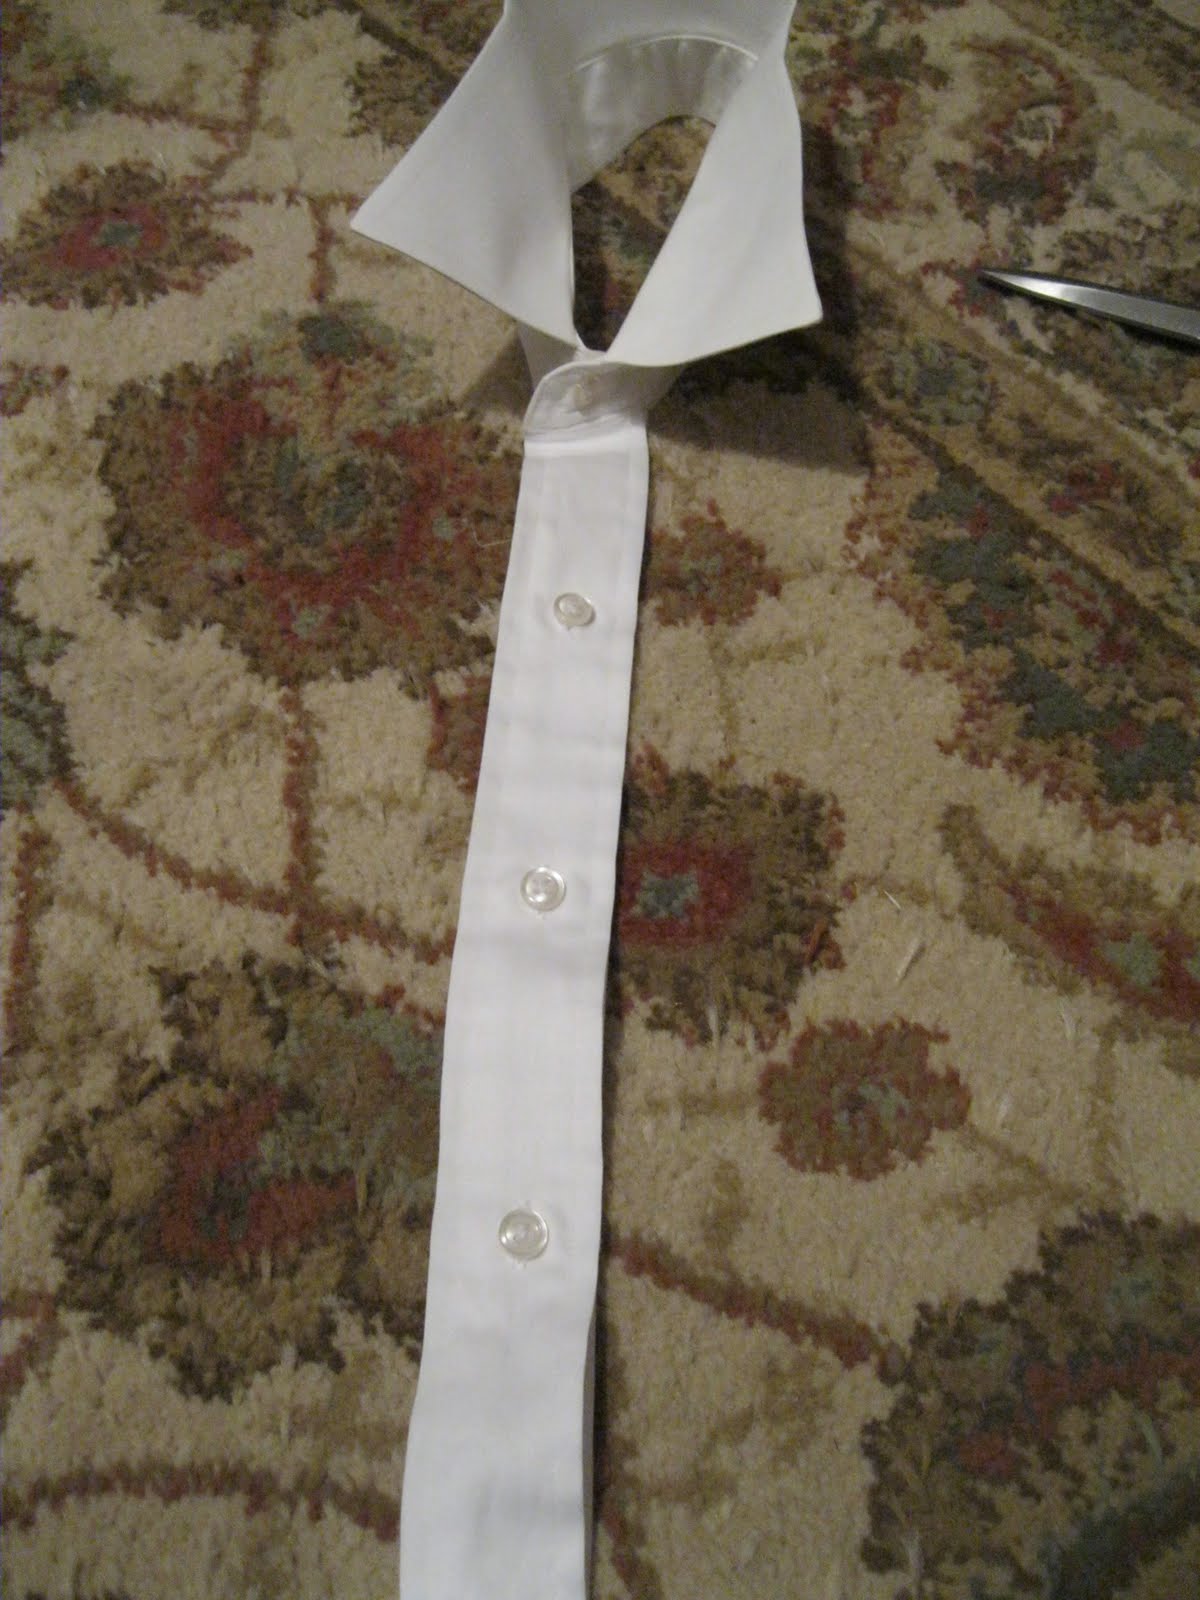
2. Take your wreath form and lay it on top of your men's shirt, with the top of the wreath form at the top of the collar. Cut off the bottom of the shirt about two inches below where the bottom of the wreath lies.

3. Now, carefully cut along the button placket towards the collar, following the seam as closely as you can.

4. When you reach the seam where the collar is joined to the front of the shirt, continue cutting along seamline around collar. (Be sure to cut on the bottom collar seam - you want it to be able to fold over later.)

5. When you reach the seam for the opposite button placket, cut down it along the seam as with the other side. It will look like this when you're done.
Set this aside until later.
6. Now you'll want to decorate your DAD letters. I painted mine with some turquoise blue acrylic paint (adding a coat of Mod Podge once it was dry for shine.) You can mod podge fabric if you like or do glitter. Be creative!


7. While you're waiting for those to dry, now's the time to make your bow tie (if you're making one). I had this polka dot Amy Butler fabric left over from my March Bag - it was screaming to be made into a bow tie! Christie's tutorial was easy peasy (as promised) and I whipped mine up in about 15 minutes. (I improvised a little, using hot glue to secure rather than stitching and velcro, seeing as this wasn't going to be a functional bow tie.)

Cute right?!!
8. Alright, time to get dressed. Put your bowtie on the shirt collar and fold collar down. Then center your collar over the wreath form.

9. Secure back and front sides of the collar to the wreath with hot glue.

9. Pull your button placket straight down and center on the bottom portion of the wreath, wrapping around the circumference of the wreath. Secure with hot glue.
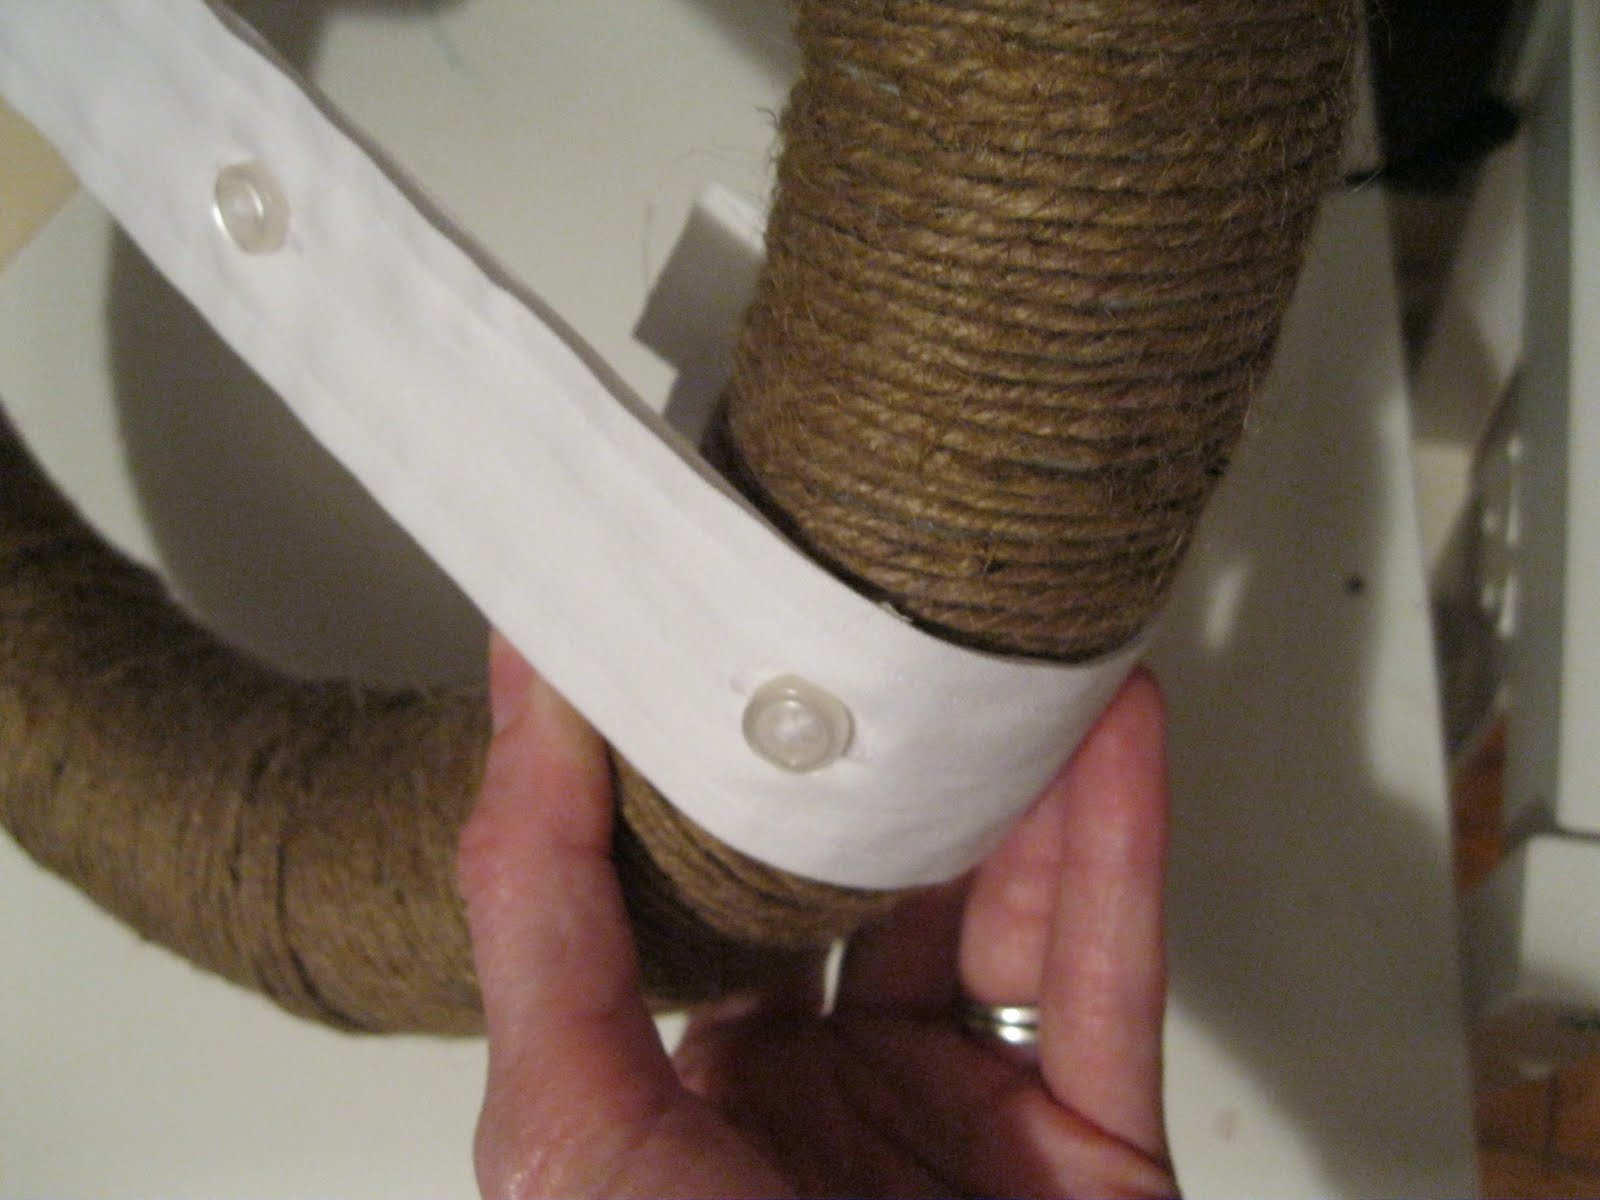
10. You should now have an almost finished wreath!

11. Now it's time to add the letters. Place them on your wreath to your liking and hot glue those bad boys down.

12. And you're done! Easy, right? Now go hang this on your door to say Happy Father's Day to all who enter!
*** I added a ric rac boutonierre later (tutorial to soon follow) ***


Hope you have a Happy Father's Day with the man of your house!
Linking up with Today's Creative Blog and House of Hepworths!
Saturday, June 4, 2011


Friday, June 3, 2011
(Sewing for Me} The March Bag
Drum roll please...

As promised (long ago)... here is my completed March Bag, from Fourteen May. As I've said before, I fell in love with this bag just the way that Melissa Mortenson made it, so I searched for the fabrics so I could replicate it. If I do say so myself, it was a great decision. ;)
Although you would think this pattern was complicated with the curved pockets and the front pleats, it was actually a rather easy sewing project. Melissa's instructions were superb, so it made construction of the bag simple. Just like I like it (I can't stand when I have to spend more time interpreting the pattern than making the project, kwim?) The only part of the bag that made me want to pull my hair out were these bad boys: the bamboo handles.

The ribbon holders are sewn into the band of the bag prior to putting the handles on, so this part was a bit of a challenge. There is a screw holding the loop onto the handle, but it was impossible to remove, no matter how hard I tried. Enter my husband, armed with pliers and a wrench. Not kidding. He pried the loops open, placed the handles on the ribbon, and then squeezed them back together.
I love him.

Here's a little side view of the seam - I love how the pockets go all the way to the edge - I can fit a ton of things in there!

And a little peek at the interior, with all of my things jammed in the pockets. If you look closely, you'll see a matching wallet in there. Yes, I could've made it - but I didn't. I got it from Happy Kathy's etsy shop and I love it. It just may be the perfect wallet. Just sayin'.
One thing that was a little tedious about the pattern... having to hand sew the band to the inner lining. It's so hard when you're at that final part of a project, so close to enjoying the fruits of your labor... and having to hand sew through fabric, interfacing, and canvas was a booger. (I had a bruise on my thumb, for reals. *note to self* Must invest in a thimble. Oh, and don't think I didn't try to cheat and machine sew it... let's just say that even a Denim needle on my Singer couldn't perform through all those layers. Darnit.)

In the end, though, it was all worth it. I have a gorgeous bag to grace my arm this summer.
Want to make your own March Bag? Head over to Fourteen May!
Wednesday, June 1, 2011
Pounding the Pavement
I've recently dusted off my running shoes and reacquainted myself with an old love... running. Way back when, I used to run daily. It was my time to exercise my body, free my mind, and release myself from the pressures of day to day life.
Then I got busy running other things... work, children, stuff... everything but running in its purest form.
I won't say it's been easy. I don't particularly like having to go for my runs early in the morning before I got work. My body simply does not find it as easy as it once did. And some mornings I'd just rather be sewing or enjoying my coffee while watching the news. But it's been good for me. Good for my mind. Good for my sense of well-being. Hopefully, it'll be good for this saggy body too. My goodness, how my laziness has caught up with me.
If all goes well, I'll keep up this renewed habit and make it a lifetime pasttime. (Hee. That sounds funny, doesn't it?!) Maybe I'll be like Carrie and run a marathon in a cute little shiny skirt. (The girl ran it while pregnant. Seriously. I am so not worthy.)
Care to join me? I'll be lacing up around 6am...
Subscribe to:
Posts (Atom)
LinkWithin


