Monday, January 2, 2012

One Month to Win It - Season 7


Photobucket

Today marks the first week of competition in Season 7 of One Month to Win It!

The contestant projects, including mine, will be up tomorrow morning for your voting, so please be sure to visit and cast your vote.

Now which project is mine??

Hmmmmmm.

You'll have to make that guess on your own, as the projects are anonymous during voting, but once voting is closed, I'll reveal my project and the tutorial!

Make sure you check in tomorrow on OMTWI to vote - hopefully I'll get to stick around for week two!


Sunday, January 1, 2012

Happy New Year!

It’s 2012.
How did that happen so quickly?!
004 copy
We had a low-key New Year’s Eve at home with the girls, sitting out by the outdoor fireplace, roasting marshmallows and eating smores… listening to all of the fireworks pop around us and occasionally catching a glimpse of some in the distant night sky,
We welcomed 2012, Eastern Standard Time.
Yes, we live in Texas.  HA!
011 copy
To celebrate the occasion, I whipped up a  little 2012 banner complete with the Blog Fairy’s Champagne girl graphic centered in a firework burst of sheet music!
016 copy
This photo represents a goodbye to a great 2011 as I peek over the Christmas tree (yes, it’s still up – I leave it up every year until January 6th, the Feast of the Wise Men).

Here’s to a fantastic 2012!


Linking here:

Friday, December 30, 2011

Christmas Recap

As things are winding down for the holiday season, I thought I’d share a few snippets of our Christmas…

My daughter’s first letter to Santa… (she got most of what she asked for thanks to St. Nick!)  And no, Santa does not have a hook arm – that’s a candy cane ;.  Gotta love first grader art, right?

Aforementioned first grader in the giant coloring castle that has taken over my office!

Homemade Marshmallows for the neighbors, made with this recipe from the Brownie Points Blog.

Christmas morning breakfast of homemade waffles and fresh fruit (and hot cocoa with colored marshmallows, of course).

003 copy

And the girls in the Christmas outfits they wore for about, oh, five minutes.  Grrrr.  (I made them Santa shirts and red satin circle skirts with Dana’s tutorial, btw.)

Hope you had a wonderful Christmas – can you believe it’s almost 2012??!!

Monday, December 26, 2011

Estate Sale Console Makeover

I sort of revealed my red console in my Christmas Cookie party post, but what furniture makeover is complete without a post completely dedicated to it, right?!  Right.
My sister found this console in an estate sale held at the home next to her:
photo
As you can tell, it was in excellent condition.  Whoever had it either never used it or took very good care of it – score for me either way.  Oh, and did I mention it was only 50 bucks?  Super score!
I know what you’re thinking… why make over a piece that doesn’t have anything wrong with it?  Believe me, Mr. home.made. would agree with you.  He just couldn’t understand why I’d want to paint “perfectly good wood”;  honestly, I thought about keeping it as-is for a very brief second for that same reason.
But then I realized – it’s great as-is, but I wanted to make it mine, to make it more home.made.  Plus, I have a lot of dark wood in my home between furniture and wood floors and wood plantation shutters, so more dark wood is not what I had in mind.
Enter Glidden’s Red Delicious paint.
Rather than sanding, I decided to simply prime this piece.  I ran out of my foam rollers, so I used a textured wall roller for the larger areas – not a good idea if you’re looking for smooth, even coverage, mind you.  I however, like the stippled effect it left – after applying the red paint, the stippled primer coverage gave the paint the effect of an old piece of enamelware – it was a happy accident!
I wanted a hand-painted look, so I brushed two coats of the paint on with my trusty Purdy brushes.  Once dry, I brushed on a dark umber glaze made by mixing tintable glaze with dark umber craft paint.  I then wiped it off with scrap t-shirt rags, leaving more of the glaze in the natural nooks and crannies of the wood to enhance the patina.
I finished it off with a coat of Annie Sloan soft furniture wax, buffed to a soft sheen.
034 copy
I painted over the original hardware with some chalkboard paint to give them a matte finish, leaving a little of the gold peeking through for a worn look.
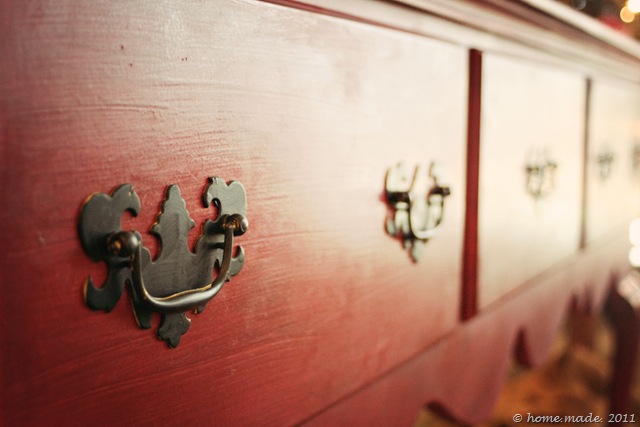
037 copy
048 copy
I did a little bit of sanding to distress the edges just enough to show the white layer from the primer.
045 copy
This console has been a perfect addition to my dining area.  It’s already been put to use as a buffet during our cookie decorating party and was a perfect complement to my cherry pie and vintage Rosepoint China on Christmas Eve. 
041 copy
And I’m happy to say, it even won the approval of Mr. home.made.
Turns out that “perfectly good wood” is sometimes perfectly good to paint.


Linking up here:


Wow Us Wednesdays


Power of Paint Party
Transformation Thursday
Strut Your Stuff
Miss Mustard Seed

Saturday, December 24, 2011

Merry Christmas


Source: etsy.com via Lila on Pinterest


Warmest holiday wishes from my family to yours!

Tuesday, December 20, 2011

Christmas Skirt Roundup

So it's only, what, four days until Christmas and I have yet to make my girls' Christmas outfits! Never fear - the fabric and notions are purchased and waiting and I have an idea of what I'm going to put together, but a little Pinspiration never hurts, does it? Here are some of my fave ideas...


The little girl's couture skirt is divine.


You can't go wrong with pink AND tulle, can you?


A circle wrap skirt that looks easy peasy to make!


What girl (young or old) doesn't like a pettiskirt?


The utilitarian skirt, complete with pockets!


Simple circle skirt with an elastic waistband.


Yet another circle skirt... sensing a theme? One of these skirts is what I plan on making my girls for part of their Christmas outfits, but I won't tell you now... I'll show you once they're done! Hopefully I'll have make time to finish the special accessory I have in mind...

Are you making any wearables this holiday season?

Have you finished them yet?  Please say you're still working on them like me!!

Saturday, December 17, 2011

Kid-Friendly Craft: Cinnamon Ornaments

School's out for the holidays.

For those of you that are parents, that signals just the beginning of the "I'm Bored" and "There's Nothing to Do!" doldrums...

I have a Christmas craft for you that will make something beautiful for your home (that smells amazing!) and give those idle hands something to do: Cinnamon Ornaments.

006 copy

What You’ll Need:

3/4 c applesauce

4.12 oz. ground cinnamon (large bottle)

bamboo skewer or drinking straw

string/ribbon

How to:

This is so simple, I’m just going to give you instructions and let you run with it, k?

1. Preheat oven to 200°F. Mix applesauce and cinnamon in small bowl until a smooth ball of dough is formed. (You may need use your hands to incorporate all of the cinnamon.) Using about 1/4 of the dough at a time, roll dough to 1/4-inch to 1/3-inch thickness between two sheets of plastic wrap. Peel off top sheet of plastic wrap. Cut dough into desired shapes with 2- to 3-inch cookie cutters. Make a hole at top of ornament with drinking straw or skewer. Place ornaments on baking sheet.

2. Bake 2 1/2 hours. Cool ornaments on wire rack. (Or, to dry ornaments at room temperature, carefully place them on wire rack. Let stand 1 to 2 days or until thoroughly dry, turning occasionally.)

3. Insert string/ribbon through holes and tie to hang.

Source

Enjoy!

LinkWithin

Related Posts with Thumbnails