Showing posts with label fall. Show all posts

Monday, October 13, 2014

Halloween No-Sew Runner Tutorial

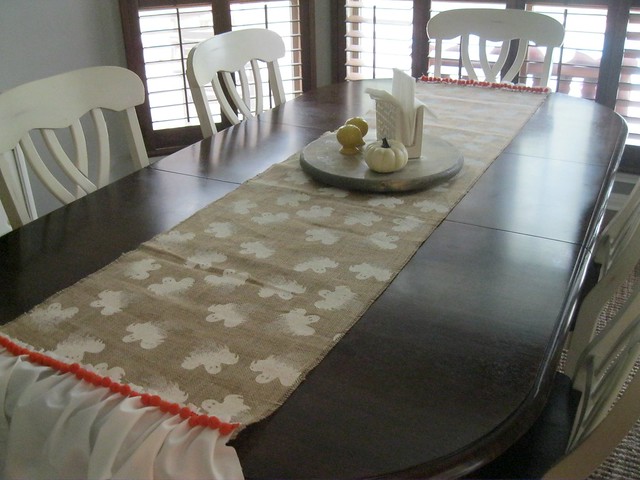
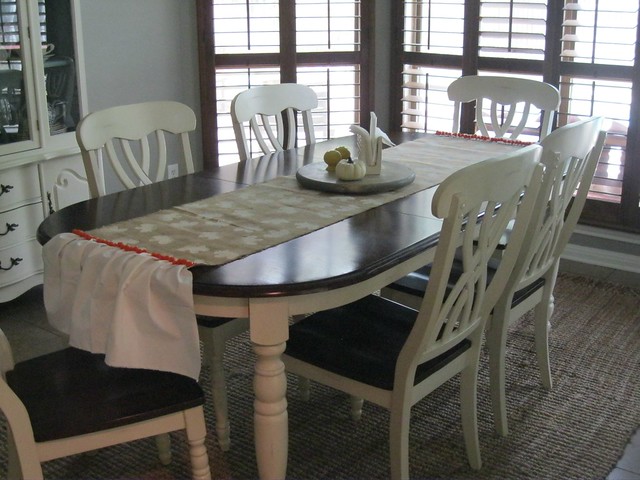
Hey there friends!  Hope you're having a great week so far... can you believe its already mid-October?  I know I can't, which might explain why I'm just now starting to decorate my home for Halloween.  I'm starting with this No-Sew Halloween Runner:


I found this great ghost-stamped burlap at Joann's a few weekends ago and knew I wanted to use it for a table runner.  I had intended to sew it but couldn't get the mojo to bring out the old sewing machine so I used the next best thing... a little hot glue.  My plan is to just spot clean as needed so the glue was a great option here.

No Sew Runner


Halloween No Sew Runner

This runner is super-simple to make:

You'll Need:
2 yards burlap (longer if you have a longer table)
1 yard white muslin (or other fabric)
pom pom trim
hot glue

Instructions:
1.  Cut burlap to desired width.  Mine is 16 inches wide.

2.  Pull burlap threads along long sides to create frayed edge.

3.  Cut muslin to desired length.  Mine is 10 inches long.  Width of muslin should be double the width of your runner.  Mine is 32 inches.

4.  Fold muslin in half to find middle of width.  Hot glue midpoint to the midpoint of the burlap.

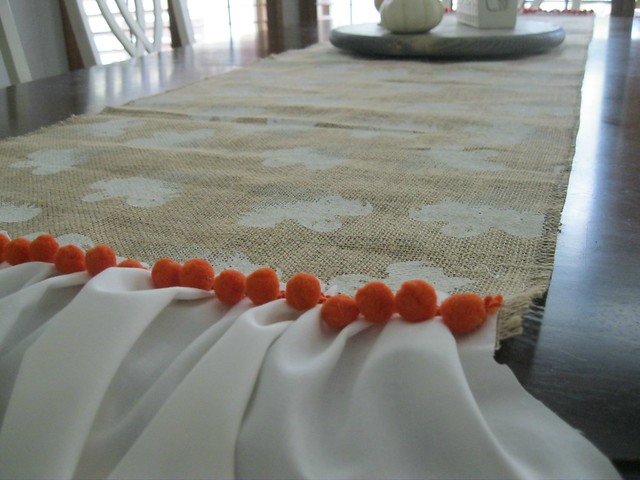
5.  Beginning on one edge, secure the fabric to the burlap with glue as you gather in even puckers.


6.  Next, hot glue pom pom trim just under the top edge of the fabric.


7.  Repeat on the opposite edge, and that's it!  Enjoy your runner!

No Sew Runner


No Sew Runner

Halloween No Sew Runner

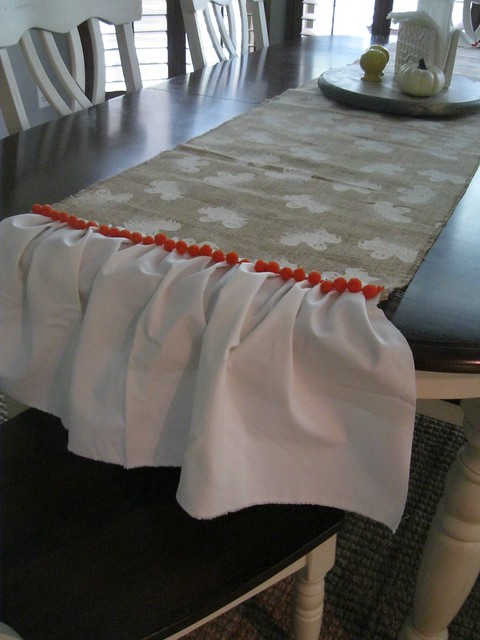
I'm already loving my new table runner, and I love how easy it was.  I foresee more holiday no-sew runners in my future... I can already imagine some red and turquoise christmas fabric with natural burlap!

I'll be back with another Work it Wednesday post and will be sharing more details on that cute lazy susan gracing my table... make it a great week!

Linking here:
Inspiration Gallery
Inspire Me Please

Monday, September 29, 2014

DIY Felt Acorn Garland

One of my favorite things about this time of year is collecting fallen acorns as I walk around my neighborhood.  I love using them in my décor and fall crafts, like my Acorn Tree or Glittered Acorns or Giving Thanks Wreath… and my latest addition, a DIY Felt Acorn Garland.


One of the bad things about fresh acorns is that they eventually begin to dry out and shrink and then fall out of their caps, so making a garland out of the real deal would be beautiful but it wouldn’t last long.  I decided to use some leftover felt balls to create a longer-lasting acorn garland.

To make this, you will need:
  • Acorn caps of varying sizes
  • Felt balls of varying sizes
  • Twine or Yarn
  • Hot Glue
Felt Acorn DIY

This project is very simple – simply hot glue the felt ball inside the acorn cap.

Felt Acorn DIY Tutorial
DIY Felt Acorn

Next, hot glue the acorns to a thin piece of twine or yarn for your garland, leaving room at the ends for hanging.  So simple and such a sweet touch of fall.

DIY Felt Acorn Garland

I added mine to my Dining Room Hutch, along with a glittered apple garland.

Tutorial Felt Acorn Garland

I look forward to using this garland for many seasons to come… I’m already thinking about making another with all white felt balls – wouldn’t that be pretty?  I could even find a way to work it into my Christmas décor somehow…

Have you been making anything with fallen acorns?  Link up in the comments so I can see!

Linking here:

Monday, October 21, 2013

Batty Halloween Wreath

Happy Monday y’all!  Today I’m sharing my Batty Halloween wreath – after a few days of rainy, gloomy weather, I finally got a little bit of sunshine so I could take some pictures!

Spooky Bat Wreath

This wreath started out completely different – my original idea that seemed so great in my mind turned out to be an epic fail so I had to go back to the drawing board.  A trip to Walgreens for some allergy meds ended in the Halloween aisle, where a new idea was born and I then proceeded to wipe ‘em clear out of fake bats.

Circling Bats Wreath

I wrapped the wreath form with burlap ribbon and secured the bats with just a few straight pins, which luckily worked because hot glue does not stick very well to whatever rubber/plastic material these things are made of.

My inner English teacher is cringing that I just ended a sentence with a preposition but hey, I’m a rebel like that.

EEK Bat Wreath

The flying bat in the center carries a Halloween message on a burlap banner… EEK!  (My daughters told me that bats don’t say eek, they squeak.  Love them.)

Spooky Bat Halloween Wreath

And now just a few more pics…

Circle of Bats Halloween Wreath


home made Spooky Bat Wreath

It’s a little batty, but a lot of fun… only 11 sleeps til Halloween!

Linking here:

Wednesday, October 16, 2013

Whimsical Witch Halloween Mantle

Morning lovelies!  I’m finally getting my Halloween on around here… I typically begin with a wreath reveal but since my wreath idea is still being tweaked, I thought I’d start by sharing my Whimsical Witch Halloween Mantle!

home.made

I kept most of the elements from my Aqua and Wood Fall Mantle and just added in some fun Halloween touches.  The inspiration was a sassy little ceramic pumpkin witch my sister gave me a few years back.

Witch Pumpkin Halloween Mantle

I dressed up some small pumpkins with decorative witch hats from the Halloween party section at Hobby Lobby – I just slid them on over the pumpkin stems for a perfect topper.  My youngest hoards saves all of her glasses when we go to 3D movies and pops the lenses out for some reason, so I took advantage of that and used them as props for my little pumpkins.  Said daughter also convinced me she needed sticky glow-in-the-dark eyeballs from the Halloween aisle, so I happily obliged and stole a few for my pumpkins (I secured them with a straight pin).

Witch Pumpkin Mantle

The purple LED lights are battery operated – which is great because we all know that electrical outlets by mantles are never close enough for our decorating needs (you know what I’m saying)!

Witch Hat Garland

I added some “creepy fabric” for some extra texture and then made a teeny witch hat garland with some leftover stash ribbon trim.

Whimsical Halloween Mantle

I’m enjoying this Whimsical Witch mantle so much that I’m already conjuring up ideas about how to modify it to keep it for Thanksgiving… wonder how long those pumpkins will last??

Hope you’re having a great week so far!

Linking here:

Savvy Southern Style

Inspire Me Please Party

The Inspiration Gallery

Fabulously Creative Friday

Somewhat Simple

Whipperberry

Tatertots and Jello

Funky Junk Interiors

Too Much Time

I Heart Naptime

Three Mango Sides

The Sunday Showcase

Home Stories A to Z

Inspiration Exchange

Power of Paint Party

The Scoop

Tuesday’s Treasures

The 36th Avenue

Transformation Thursday

Be Different Act Normal

It’s Overflowing

Beneath My Heart

Wednesday, October 2, 2013

{Tutorial} Embroidery Hoop Pumpkins

Embroidery Hoop Pumpkins

I showed you these Embroidery Hoop Pumpkins with my Fall Mantel reveal, and as promised, here is the tutorial to make some for yourself!

You Will Need:

Embroidery Hoops (mine are 4 inch)

_MG_1901

Instructions:

  1. Separate your inner and outer embroidery hoops and loosen the bracket slightly.  Slide an inner hoop inside the outer hoop. 
Embroidery Hoop Pumpkin Tutorial

2.  Repeat with another inner hoop, separating them equally, and tighten the bracket.

Embroidery Hoop Pumpkin Tutorial Top

3.  You can also make a pumpkin with two outer hoops and one inner hoop by forming a square with your brackets and then tightening the top bracket.

_MG_1909 copy

And that’s it!  Simple and beautiful and perfectly pumpkin-shaped:

Monday, September 30, 2013

Aqua and Natural Wood Fall Mantle

Fall Mantel Blue and Natural

Happy Monday friends!  I’m excited today to finally show you my aqua and natural wood fall mantle!
This mantle has slowly been in progress over the last week, but the already shorter days of fall were making it a little difficult to get decent lighting for pictures when I got home in the evening.  I was finally able to snap some pics for you and here it is!

Linen Oak Leaf Garland

If you follow me on Instagram, then you got to see a sneak peek of this linen oak leaf garland early this week.  To make this, I simply traced an oak leaf image from my computer screen, then traced onto my fabric.  I got this gorgeous floral linen long ago on clearance at Hobby Lobby, and it’s been sitting quietly in my stash waiting to be made into something beautiful.  After cutting out the leaf shapes, I tied them to a thin twine that I hang from my mantle with Command small wire hooks.

Fall Mantel Wheat

I used the leftover wheat from my Wheat and Hydrangea Wreath by placing it in the aqua vase that I found on my recent IKEA shopping trip.  And in lieu of the traditional real pumpkin, I made some of my own… Embroidery Hoop Pumpkins, which I’ll show you how to make later this week.

Fall Mantel

Aren’t they fun?!  *squee!*

Embroidery Hoop Pumpkin

Keeping with the embroidery hoop theme, I also made a hand-stitched pumpkin with an oblong embroidery hoop, some osnaberg fabric, and some hand-stitched pumpkin grooves.  I love how the wooden brackets on top resemble a pumpkin stem without even trying.

Blue and Natural Mantle

So that’s it!  This will be my view for the next several weeks until it’s time to start spookin’ things up around here for Halloween.  I already made a trip to the costume store today with one of my littles, so it’s just around the corner.  Hope you’re enjoying these first weeks of fall…

Are you decorating for fall or do you skip straight to Halloween?

Linking Here:

Friday, September 20, 2013

Wheat and Hydrangea Fall Wreath

Simple Fall Wreath

Hey hey friends!  I’m finally starting on my fall décor after crawling out of the craziness of school starting up again and having one kiddo in soccer and the other in karate (parental torture… can I get an amen?).  Anyhoo, back to the fall décor, right?  Today I’m sharing my Wheat and Hydrangea Fall Wreath with you.

Polka Dot Burlap

I found all of the supplies for this wreath at Hobby Lobby: a grapevine wreath, faux wheat and pumpkins, and the coolest polka dot burlap hydrangea picks ever.  With the fall items on sale and my 40% off coupon, I spent less than $10 total and I have enough leftover wheat stalks to use elsewhere around the house.

Wheat Hydrangea and Pumpkin

I love the combination of natural elements like grapevine, wheat, and pumpkins with the unexpected pop of the fun polka dot flowers.

Simple Fall Wheat Wreath

The brown, orange, and white color scheme will lend to a smooth transition to Halloween décor next month… and it just so happens to go pretty well with a turquoise door.  But I’ll let you decide that for yourself…

Simple Fall Wheat and Hydrangea Wreath

Hope you’ve had a great week… tell me, is it cool where you are?  If so, please tell me all about it so I may live vicariously through you!

Sharing here:

Wednesday, September 11, 2013

Fall Decor Ideas

Hi friends... are you ready for fall yet?  I know I am!  I am so over these hot Texas days and am ready for the cooler days ahead.  Although I'm still working on this year's fall decor, I thought I'd share some of my favorite past fall decor ideas with you.


A Simple Moss and Pumpkin wreath is perfect for early fall.


You can use the leftover moss to make a Moss Pumpkin Topiary.


Ric Rac Pumpkins are a quick and easy way to personalize small pumpkins.


Silver Leaf Pumpkins are a nice touch for any mantel.


And just in case you're ready for some Halloween inspiration... here's the second version of my moss wreath: the Spooky Skeleton Wreath.


So, are you ready to get your fall decor on?

I will be pulling out the pumpkins this weekend and adding some fall touches around my home.  I stocked up on fall scents from Bath and Body Works a couple of weeks ago so it already smells like fall - now I just have to add my little autumn touches here and there to make it official!

My project list seems to be getting longer lately but I have plans to knock out a few things this weekend.  A certain dresser is begging to be my milk paint guinea pig...

Hope you are having a great week!  What projects are you working on right now?

Monday, September 2, 2013

{Kid’s Craft} DIY Apple-Stamped Placemats for Fall!

home.made. Apple Stamped Placemats

It’s officially September, so it’s time to decorate for fall (even if it’s still 100 degrees outside…) - I’m so excited to show you a fun project I did with my girls a couple of weeks ago to add a little touch of fall to our kitchen table: DIY Apple-Stamped Placemats!

This project was easy, my kids loved it, and I used things I already had on hand so it cost me nothing!

You’ll Need:

Sturdy Fabric cut into 12” x 18” pieces (I made four)
Fabric Paint or Acrylic Paint mixed with Liquid Fabric Medium
Apple, cut in half
Cutie-pie Kiddo Helpers :)


9652235473_eea1690d95_z

I used cotton duck cloth for our placemats – after cutting, I simply washed and dried them for a rustic frayed edge.  We kept it traditional used red and green for our apples, but any color would be fun so feel free to experiment!

** Kid’s Craft Tip** Kraft paper works great to protect your work surfaces while crafting (especially when kiddos are involved).

9655517222_bcbf4a082e_z

Coat apple stamp with paint (you might need to help with this part)…

9655528120_42f5296140_z

And stamp away.

9655549938_2b9d09bef1_z

Allow your paint to dry and follow instructions for setting paint (if applicable).  That’s it!  You’re ready to set your fall table with your new apple-stamped placemats and if you’re a blogger like me, take the obligatory photos!  My kiddos always think mama’s a little crazy when I snapping photos of my projects – do yours act this way too?

home.made. Apple Place Setting Close

home.made. Apple Place Setting

home.made. Apple Stamped Placemat

Hope you’re having a great start to your September…

Linking here:

Savvy Southern Style

Inspire Me Please Party

The Inspiration Gallery

Fabulously Creative Friday

Somewhat Simple

Whipperberry

Tatertots and Jello

Funky Junk Interiors

Too Much Time

I Heart Naptime

Three Mango Seeds

The Sunday Showcase

Home Stories A to Z

Inspiration Exchange

Power of Paint Party

The Scoop

Tuesday’s Treasures

The 36th Avenue

Transformation Thursday

Be Different Act Normal

It’s Overflowing

Beneath My Heart

Happy Housie

LinkWithin

Related Posts with Thumbnails